
SharpCap 4.0 has a whole host of new features, but there are three major features that give SharpCap far more power and flexibility than ever before:
additionally there are a number of ease-of-use improvements designed to make your imaging easier and less error-prone:
- Additional Image processing options including background subtraction and planetary stabilization
- Pixel value readout
- Pixel position readout / Click to recenter
- ADC Alignment Assistance
- ASCOM hardware improvements
Still Camera Mode
SharpCap up to version 3.2 has run every camera like a video camera – that means that the camera is constantly taking images which show in SharpCap’s display. If you choose, you can save those images to video or picture files, but you cannot stop the camera from capturing images.
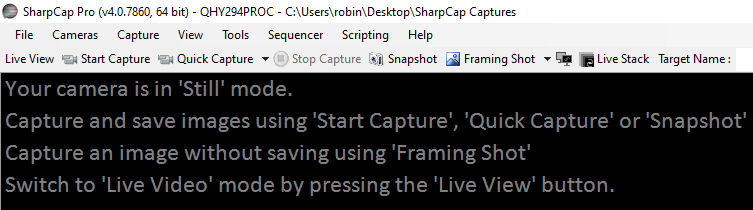
SharpCap 4.0 introduces Still Camera Mode as an alternative to the default Live Video Mode. In still camera mode, SharpCap only takes images when requested by the user pressing one of the capture buttons or by some other SharpCap function requiring an image to be captured. Most of the popular brands of camera supported by SharpCap can be used in Still Camera Mode, including Altair, QHY, SVBony, ZWO and ASCOM cameras.
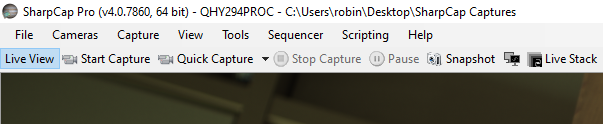
You can switch between Live Video Mode and Still Camera Mode by using the new Live View button in the toolbar. When the button is highlighted you are in video mode, when it is not highlighted you are in still camera mode.
Still Camera Mode is best suited to deep sky imaging, and is particularly useful for use with cameras that have a physical shutter (for instance DSLR cameras) or large format CCD cameras that take a long time to download the image to the computer. Still Camera Mode is also used by the Deep Sky Sequence Planner to ensure consistent results and allow reliable dithering.
Read more about still camera mode here.
The Deep Sky Sequence Planner
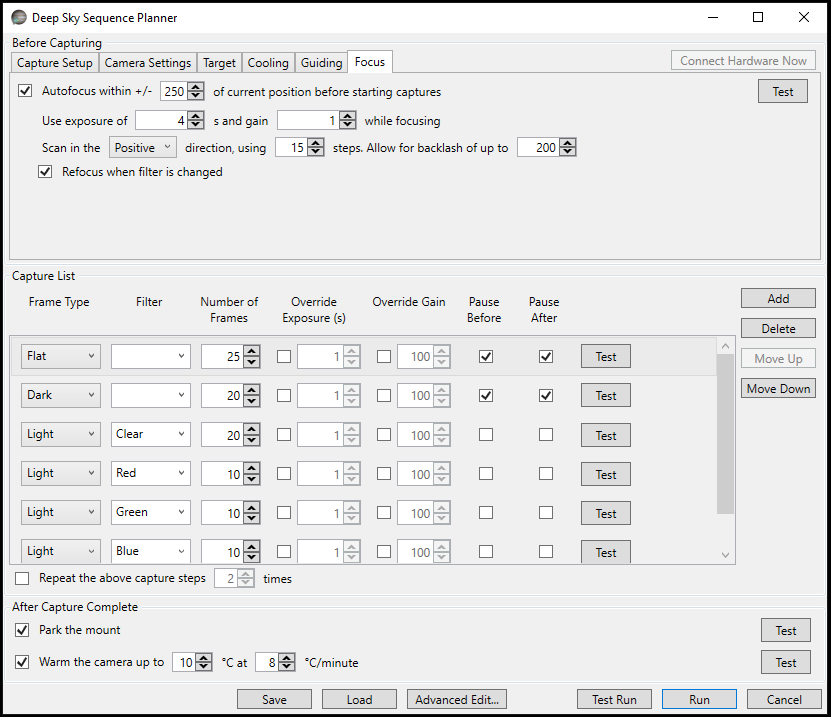
The Deep Sky Sequence Planner brings easy-to-use automated imaging to SharpCap for the first time. By simply choosing a few options regarding the set-up of your imaging session and entering a list of the types and numbers of frames to capture, you can quickly build an automated imaging plan. What’s more, almost every part of the plan has an individual Test button that you can use to make sure that the individual steps work correctly before letting the whole plan run.
Some of the things that the sequence planner can automate include:
- Setting appropriate camera settings, including measuring sky brightness and using the Smart Histogram Brain calculations.
- Using a GOTO mount to slew to the target and optionally center it using plate solving
- Control camera cool down and warm up
- Monitor autoguiding and dither between frames if desired
- Autofocus before imaging and or when changing filters
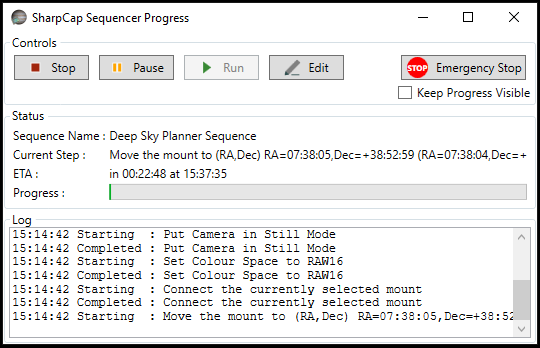
Once you have designed your imaging sequence, you can even perform a Test Run to check that everything works when the individual steps are put together – this will run all the separate steps in the sequence but only capture a single frame of each type. You can then run your imaging sequence for real – either returning to the warmth of the house or monitoring SharpCap’s progress via the Sequence Progress Window.
Note: The Deep Sky Sequence Planner is a SharpCap Pro feature. Without a SharpCap Pro license, sequences will only be allowed to run for a maximum of 5 minutes.
Read more about the Deep Sky Sequence Planner here.
The Advanced Sequence Editor
The Deep Sky Sequence Planner uses a much more powerful and flexible sequencing technology built into SharpCap 4.0 to help plan and execute its sequences. If you want to set up an automated imaging sequence that isn’t possible using the Deep Sky Planner, you can use the full Sequence Editor to achieve your goals. You can even start out designing a sequence in the Deep Sky Sequence Planner and then press the Advanced Edit button to switch to the advanced editor to modify your sequence further.
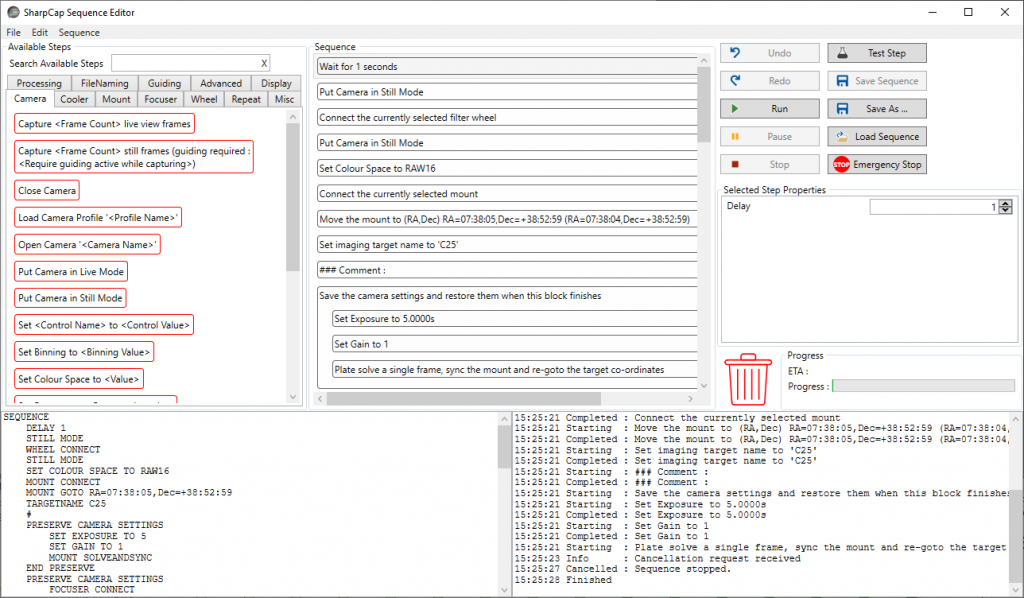
Sequences are built by combining in various combinations and orders in excess of 90 basic steps, each of which carry out a simple function such as setting the camera exposure, capturing frames or operating a mount or filter wheel.
Steps can be dragged from the Available Steps area on the left into the Sequence List in the centre, gradually building up a list of tasks for SharpCap to carry out. Things you can do from the sequencer include:
- Selecting cameras, controlling their settings and capturing still frames or videos
- Controlling filter wheels and GOTO mounts
- Controlling electronic focusers, including autofocusing
- Monitoring guiding applications, triggering dithering
- Repeating groups of steps a fixed number of times or until a certain time
- Waiting until a certain time or until an event such as sunset
- Running other programs or launching SharpCap Python scripts
As with the Deep Sky Sequence Planner, the Sequence Editor has a strong focus on being able to test your sequences as you build them – use the Test button frequently to check that individual steps are correctly configured and work as expected.
The possibilities are already almost endless, and new functionality will be added via additional available steps to make the SharpCap sequencer even more powerful in future.
Note: The Advanced Sequence Editor is a SharpCap Pro feature. Without a SharpCap Pro license, sequences will only be allowed to run for a maximum of 5 minutes and certain steps are disabled entirely.
Read more about the Sequence Editor here.
Additional Image Processing Options
SharpCap 4.0 adds new built in image processing options:
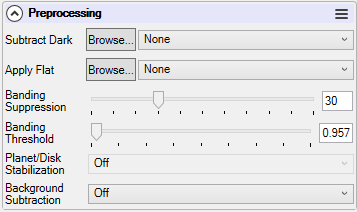
- Background Subtraction – this will remove a constant background brightness from deep sky images, which is particularly useful for eliminating sky glow (light pollution). The subtraction is compatible with dark and flat frame correction and will deal with situations where the sky glow has a colour cast.
- Planetary Stabilization – this option keeps a planet (or other bright disc) in the center of the camera frame by offsetting each image as required. While it won’t help if the planet starts to drift out of view entirely, it will keep the target steady, helping with focus judgements and with outreach presentations.
- Banding Suppression – some CMOS cameras have a tendency to produce fine horizontal bands that are visible when dark images are stretched to display faint deep sky targets. SharpCap can apply a targeted smoothing function to the image that will only affect these fine horizontal lines in the darkest parts of the image, reducing the effect of this banding on image quality.
 |  |
These image processing options will not only affect the image seen on screen in SharpCap, they will also be applied to image data saved to video or image file (except for raw unprocessed frames saved while live stacking). Background Subtraction and Banding Suppression can be used in conjuction with Live Stacking.
Read more about Background Subtraction, Banding Suppression and Planetary Stabilization.
Pixel Value Readout
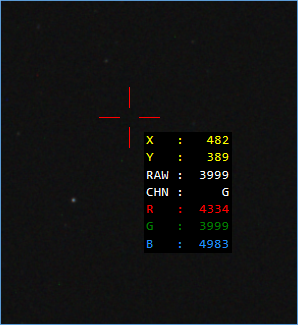
Sometimes you want to see more detail about the brightness of the image than the histogram can provide – to see the intensitity of individual pixels. The Pixel Value Readout tool gives you that detailed information. Simply select the tool from the menu and then click on the area of interest in the image to see an overlay showing the data for the selected pixel.
You can use the zoom functionality to zoom in until individual pixels are clearly visible to be sure of selecting the target pixel.
For a colour camera in RAW mode, the overlay shows not only the red, green and blue values that the pixel has after debayering, but also the raw value of the pixel and which colour in the bayer matrix it is.
Read more about Pixel Value Readout.
Pixel Position Readout / Click to Recenter
Getting your target framed just right when you are deep sky imaging can be a bit of a process of trial-and-error. Even if you use plate solving to try to correct for any GOTO errors, adjusting framing if the target needs to be slightly off-centre is tricky.
With SharpCap 4.0, a GOTO mount and a configured plate solving application, all this becomes easy. Select the Pixel Position Readout / Click to Recenter tool, perform a plate solving operation if you haven’t already and SharpCap will then be able to show you the co-ordinates of any pixel in the image, along with the direction of the +/- RA & Dec axes within the image.
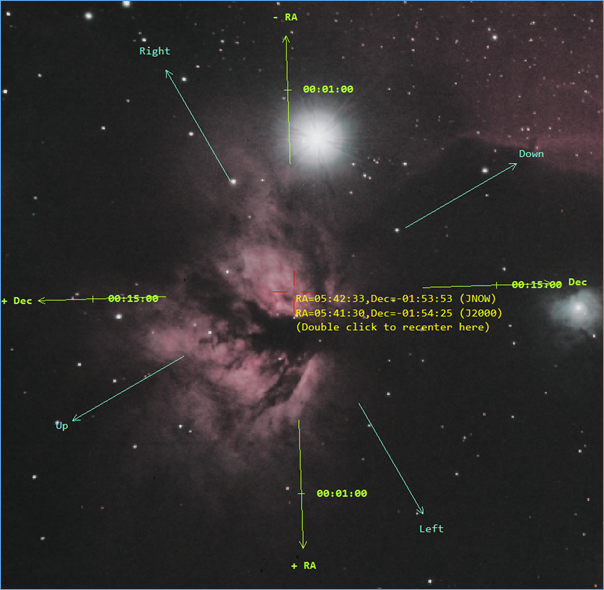
Double click on any point in the image and SharpCap will calculate the correct commands to send to your GOTO mount to put that point in the center of the image – even taking acount of any offset due to inaccurate mount movements.
The click-to-recenter part of this feature requires a SharpCap Pro license.
Read more about Pixel Position Readout / Click to Recenter.
Atmospheric Dispersion Corrector (ADC) Alignment
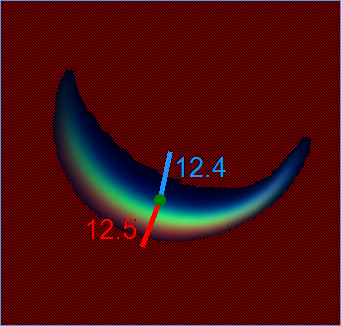
An atmospheric dispersion corrector is an invaluable tool for planetary imaging when the target planet is at a relatively low altitude in the sky – it allows you to largely cancel out the colour channel offset in the image created by atmospheric refraction.
Adjusting an ADC can be a bit of a fiddly procedure, largely because judging the point where best correction is achieved can be hard (just like judging the point of best focus can be hard). SharpCap’s ADC alignment tool helps out here but calculating the offset between the different colour channels in the image and showing an exaggerated representation of that overlaid on the image itself.
As well as showing the current colour channel offsets on the image, you will see a graph showing how the colour channel offsets have changed recently – allowing you to track the effects of your adjustments to the ADC.
Read more about ADC Alignment.
Improved ASCOM Hardware integration
SharpCap 4.0 has some significant improvements in the way that it integrates with ASCOM hardware such as GOTO mounts, focusers and filter wheels.
- The ability to flip the direction that a GOTO mount moves in response to the up/down or left/right movement buttons.
- The ability to adjust focus automatically when the filter is changed if your ASCOM filter wheel supports the Focus Offset feature and you have configured focus offsets.
- The ability to compensate for backlash in ASCOM focuser movements. You can either configure the amount of backlash in SharpCap or tell SharpCap that the ASCOM driver is itself compensating for backlash.
All of these features can be configured in SharpCap’s Hardware Settings.