
For a long time SharpCap has focused on the types of imaging that work best when you are there, keeping an eye on what is going on and monitoring progress – things like lunar/solar/planetary imaging and Live Stacking for instance.
SharpCap 4.0 now contains two ways to set up automated imaging sequences – Deep Sky Sequence Planner and the Advanced Sequence Editor.
Deep Sky Sequence Planner
The Deep Sky Sequence Planner provides an easy-to-use way to plan and automatically execute a deep sky imaging session without needing to worry about the complexities of the SharpCap Sequence Editor. Most of the options you need for deep sky imaging are catered for by the planner, including:
- Camera setup
- Cool down and warm up of cooled cameras
- Target selection and framing
- Guiding and dithering
- Automatic focus
- Filter changing
Almost all of the actions that can be configured using the sequence planner can be tested individually using the Test buttons. Additionally you can run the entire plan sequence in either daytime or night-time Test Run mode. This ability to test gives you confidence that your sequence should execute as planned when you run it for real.
If you find that you cannot achieve the results you wish using the Deep Sky Sequence Planner, you may be able to achieve them using the SharpCap Sequence Editor, which has considerably more flexibility. You can even design the outline of a sequence in the Sequence Planner and then customize it further in the Sequence Editor by pressing the Advanced Edit button.
Note that you must have your camera selected in order to start the sequence planning process in SharpCap. Having the camera already selected allows SharpCap to tailor the options available to you to match the capabilities of your camera and any other hardware. It’s also good practice to have any ASCOM hardware (focuser, mount, filter wheel) connected while planning your imaging sequence. If you have ASCOM hardware selected but not connected then the Sequence Planner window will prompt you to connect it in order to enable hardware-related planning functionality such as autofocus and filter changes.
Note that the sequence planner will not be available for cameras that cannot run in still mode.
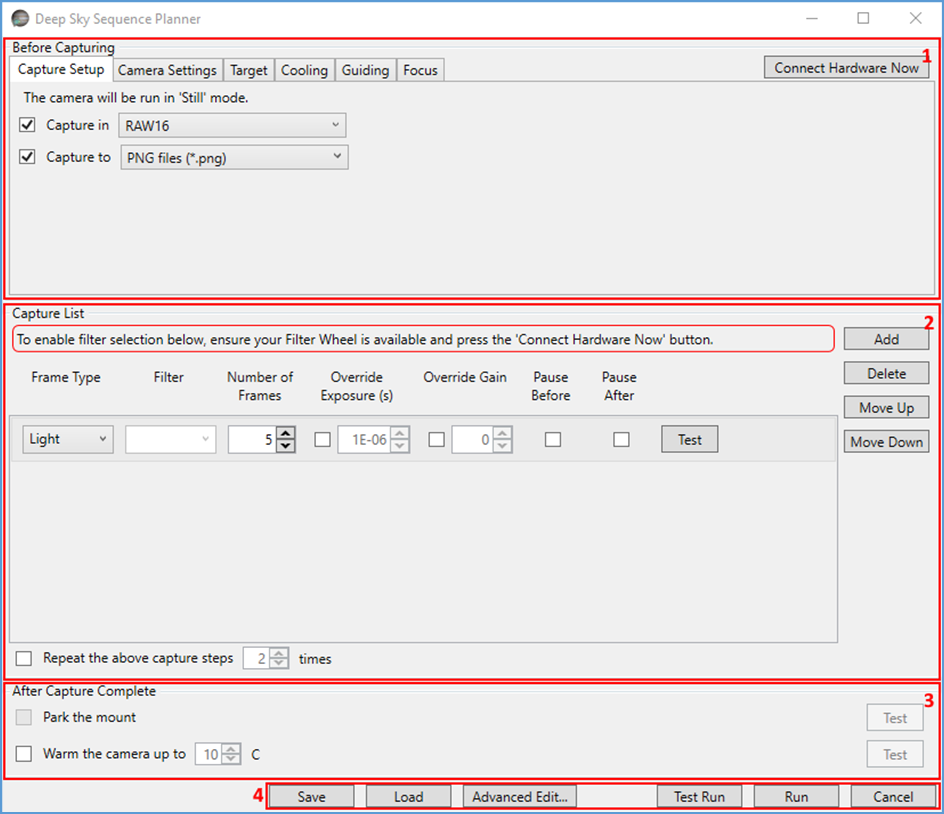
The Sequence Planner window can be divided into four distinct areas as highlighted in the screenshot below :
- The Before Capturing section, in which you can specify camera parameters, information about the target that is to be imaged and make choices related to guiding, dithering, cooling etc.
- The Capture List section. This section specifies all of the different captures that are to be carried out during the imaging session. These may include the capture of dark, flat and light frames and may also include filter changes, allowing LRGB or narrowband imaging to be sequenced.
- The After Capture Complete section. This specifies actions to be taken after the images have been captured – for instance warming up the camera or parking the mount
- The Action Buttons. The buttons here can be used to save or load or run your sequence. You can also carry out a test run and to transfer the planned sequence into the full sequence editor for further customization.
To build your deep sky capture sequence, first choose the options that you would like to enable in the Before Capturing section, then build up the capture list with the appropriate entries for dark frames, flat frames, light frames etc. Finally, that you wish to run after the capturing is complete. More detail can be found in the sections below.
Note that SharpCap will automatically save changes that you make to the sequence planner and restore the most recent settings the next time you open the sequence planner window. You can also save plans for future reuse.
The Sequence planner guides you through configuring your capture session and specifying the images to be captured in an easy-to-follow way. Configuration of the session can include
- Setting correct camera settings and cooling the camera
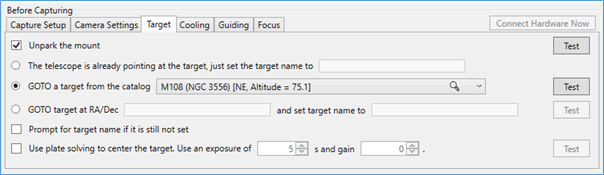
- Setting the target name or moving a GOTO mount to the correct target
- Centering the target using plate solving
- Configuring guiding and dithering options
- Automatically finding best focus (including an option to re-focus on filter change)
The main bulk of the imaging sequence comes from the Capture List – a list of frames to capture, where you can specify the capture of light, dark, flat, dark flat and bias frames as well as filter changes. For each item in the capture list, you can set the number of frames to be captured and optionally override the exposure and/or gain. The option to pause before or after capturing a group of frames allows darks or flats to be set up correctly.
The Sequence Planner is designed to allow easy testing of the individual compenents of a sequence, making it easy to be confident that your imaging plan will work correctly when you run it. Throughout the Sequence Planner you will see numerous Test buttons which can be used to test a small part of the overall plan.
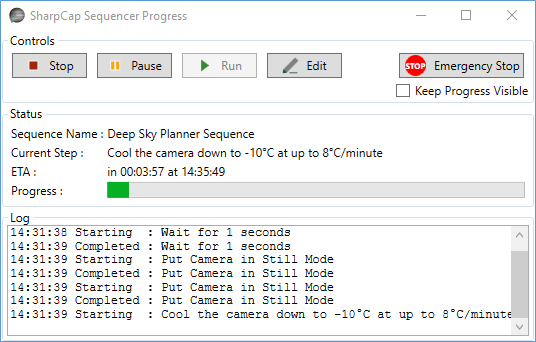
The Sequencer Progress Window
When you run your plan, you will see the Sequencer Progress Window – it is shown whenever a sequence is running (unless the main sequence editor is already visible). This window gives you the ability to monitor and control the sequence that is in progress, pause or cancel it if necessary and to perform an Emergency Stop if the situation requires it.
The SharpCap Sequence Editor
The SharpCap Sequence Editor provides a much more flexible way of configuring SharpCap’s sequencing engine than the Deep Sky Sequence Planner discussed above. Many automated imaging tasks that cannot be set up using the Deep Sky Sequence Planner can be configured using the Sequence Editor. For example:
- Automating lunar, solar or planetary imaging.
- Automating Live Stacking sessions.
- Automating imaging of multiple targets in succession.
- Automating capture of a mosaic of images.
These tasks are achieved by constructing an imaging sequence that consists of running a number of individually relatively simple steps in order. These steps can be thought of as building blocks from which the sequence as a whole is constructed. A full list of the available building block steps can be found below, but to give an idea of what is available, steps allow you to do things such as:
- Select a camera
- Change camera settings
- Capture frames as still images or a video
- Send commands to hardware – GOTO mounts, and electronic focusers and filter wheels
- Perform plate solving and autofocusing operations
- Wait for a fixed interval or until a time of day or an event (for example sunset)
- Repeat groups of other steps
- And many more…
If you are familiar with computer programming, you may have spotted by now that the SharpCap Sequencer is essentially a very simple programming language. Some things that you might expect to find in programming languages (variables and conditional statements) have been deliberately left out of the SharpCap sequencer to prevent it from becoming too complicated.
The Sequence Editor Window is divided into nine major areas as highlighted below:
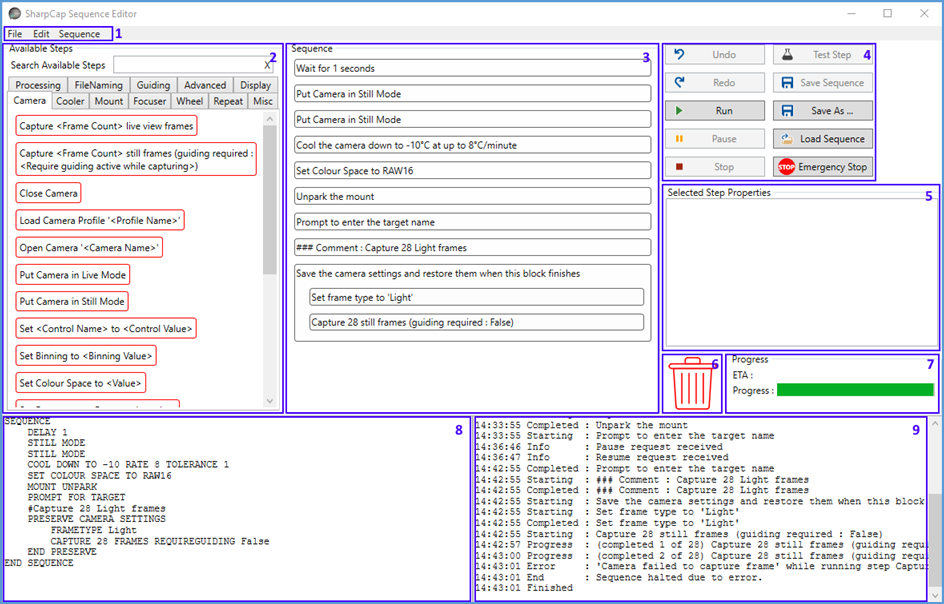
- The Menu – this provides access to loading and saving sequences, standard editing operations such as cut/copy/paste and sequence run/stop/test commands.
- The Available Steps area – this area shows the list of sequencer steps that can be used to build up your own sequences. You can use the mouse to drag steps that you wish to use from this area into the main sequence list.
- The Sequence list – this area shows the list of steps in your sequence. Each step shown here will be executed in order (from top to bottom) when you run the sequence.
- The Action Buttons – these buttons provide quick access to common actions – Undo, Redo, Test, Run, Stop, etc
- Selected Step Properties – when you click on a step in the Sequence List, any adjustable properties of the step will be shown and can be adjusted here.
- Trash Can – drag steps here from the Sequence List to delete them.
- Progress – the progress and ETA of a sequence are shown here when running a sequence from within the editor
- Sequence Listing – this area shows the current state of the sequence in code form. Note that you cannot edit the sequence by making changes in this area, this is for information only
- Sequence Log – sequence related log information is shown here when running a sequence from within the editor
Learn more about using the Sequence Editor here.