Built in integration to plate solving applications is a powerful new feature in SharpCap 3.0. With the press of a single button, SharpCap can automatically correct your mount’s position to ensure that your GOTO target is centered in the frame. To take advantage of it you need to have a supported plate solving tool installed on your computer and have connected SharpCap to your ASCOM compatible mount.
Supported Plate Solving Tools
Currently SharpCap supports four plate solving tools
At least one of these tools must be installed and detected by SharpCap for plate solving to be available. SharpCap will look in the default installation locations for these programs and use the first one it finds. Note that it’s not enough just to install the application – you also have to install the index data at suitable scales which can add up to several gigabytes of data. Fortunately each of the programs above will guide you through the installation of the index data.
All three of the plate solving tools listed above are actually just wrappers around the open source ‘Astrometry.Net’ solver, so if you are trying to choose a plate solving tool from this list, make your choice based on the UI you prefer as the actual solving engine is basically the same for all three.
Connecting your ASCOM Mount
The other thing that you need to be able to start using plate solving from within SharpCap is an ASCOM compatible computer controlled mount, which must be set up for use in SharpCap. Currently you can’t access the plate solving functionality if you don’t have an ASCOM mount connected (and even if you could, there wouldn’t be much that you could do with the solved location data anyway!)
If you haven’t already connected your ASCOM mount in SharpCap, then you can begin by going to the SharpCap Settings dialog (on the File menu) and choosing the Hardware tab.
Using Plate Solving
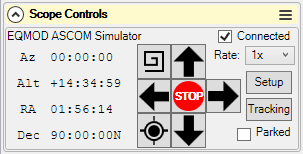
Using plate solving is incredibly easy – once you have your ASCOM mount set up and SharpCap has auto-detected a compatible plate solving application, you’ll notice a ‘Find My Location’ button appears in the mount control section just to the right of the DEC readout – like this:

If you press that button, SharpCap will perform the following steps automatically
- Capture a single frame using the current camera and camera settings
- Send that frame to the plate solving application
- Remember the current target of your mount (RA/Dec)
- If the plate solve succeeds then your ASCOM mount will be sync’d to the plate solved location
- Tell your ASCOM mount to GOTO the original target position remembered a couple of steps ago
The result of all this will be that the target that your mount was supposed to be pointing at when the procedure was launched will be centered when all the steps are complete. So, for instance if you use your planetarium app to GOTO M81, but it ends up off-center or even out-of-frame, pressing the plate solve button should fix the issue and get M81 into the center of your image.
Progress and results of the plate solving are shown in the notification bar. After the plate solve procedure has finished successfully, you will see a notification like this
The notification tells you what the plate solved position was, as well as the position of the target that the mount has now been sent back to and the size of the error in pointing that the plate solving has corrected.
Blind Plate Solving
SharpCap also includes a plate solving option for those who are not using an ASCOM mount. You can find this in the ‘Tools’ menu. This will do a whole sky plate solve and show the results in the status bar. Because the whole sky needs to be searched rather than just a small area, this option will take longer to complete. No action is taken with the result of the plate solving operation other than to display the results in the status bar.
Plate Solving Options
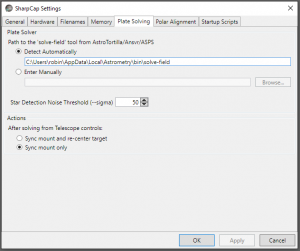
You can specify the location of the plate solving engine in case SharpCap does not detect it automatically. You can also set the ‘sigma’ option to the plate solver which controls star detection. Setting a lower sigma value will detect more stars at the risk of noise or hot pixels being picked up as stars. If you find that more than 100 stars are being detected then you may get quicker results by setting a larger sigma value to cut down the number of stars being used.
Finally, you can choose what action SharpCap should take after using the ‘GPS’ button in the mount controls.
Things to Know
- Make sure that you set the exposure, gain and other camera controls to sensible values before plate solving – the plate solver needs to be able to detect a good number of stars
- SharpCap does not use the settings that you might have configured in the UI for the different plate solving apps it supports – it has it’s own set of tested settings that it uses instead.
- SharpCap speeds up the plate solving process by restricting the search area to within 15 degrees of the current mount position. This means that if your mount pointing is out by more than 15 degrees, plate solving will always fail.
- Successful solves can often take only a few seconds, but failures take much longer as the plate solver keeps looking at more and more star combinations trying to find a match that may not exist.
- If the solved position is more than 5 degrees distant from the current mount position, SharpCap will ask for confirmation before proceeding.
- Remember that SharpCap will sync your mount to the plate solved location in order to be able to perform an accurate re-goto to the target.


