Here’s a list of the great features that you get when you upgrade from the free version of SharpCap to SharpCap Pro.
- Polar Alignment Adjustment Guidance
- Planetary Live Stacking – includes live stacking and wavelet sharpening, also works for solar and lunar images.
- Live image processing – Flat frame correction, Dark subtraction, Background subtraction, Banding suppression and Satellite trail removal
- Advanced Live Stacking – Sigma clipped stacking, comet alignment, automatic dithering, colour balance adjustments, sharpening and noise reduction
- Automated Imaging – Deep Sky sequence planner, Lunar/Solar Mosaic planner, Solar System sequence planner, advanced sequence editor, seeing triggered captures
- Focus Assistance – Automated focus scans, fully automatic refocus
- Target finding and tracking – Click to Recenter, Feature Tracking, custom deep sky catalogs, Push-To assistance
- Usability – Image auto-stretch, Two monitor view
- Camera analysis and settings guidance – Custom deep sky exposure setting guidance, export data from Sensor Analysis,
- Other – ADC alignment from image features, live stellar photometry estimation, Python scripting language, increased memory usage limits
You can also find out more by reading the SharpCap Pro FAQ, or you can buy SharpCap Pro to purchase a one year license.
Polar Alignment Adjustment Guidance
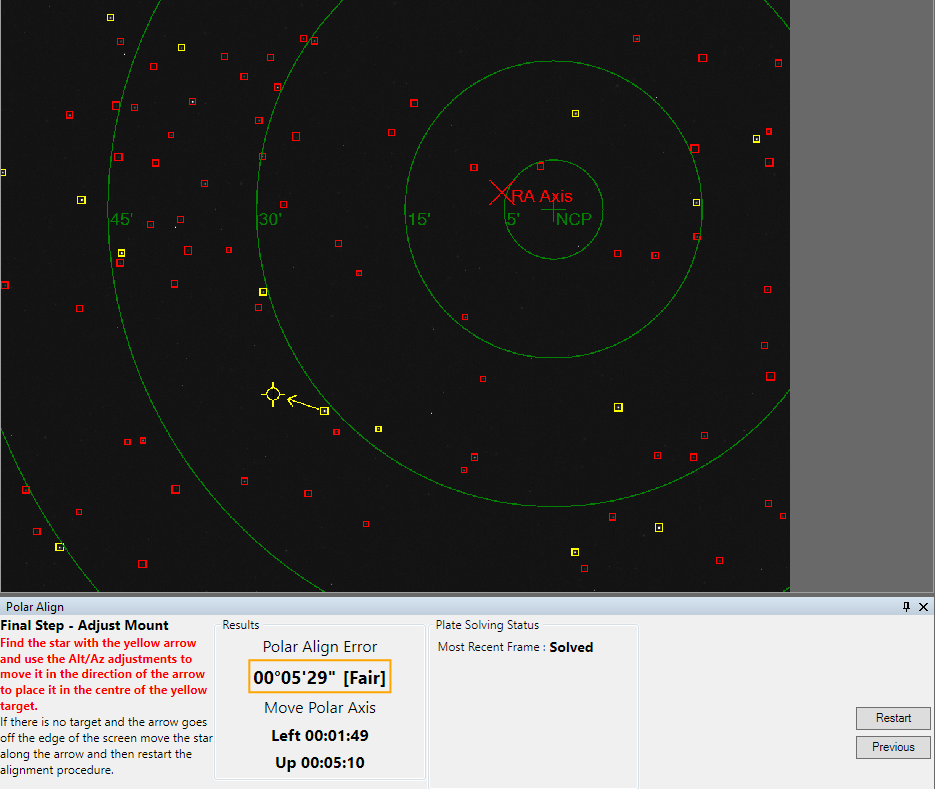
SharpCap’s easy to use and rapid polar alignment procedure is improved in SharpCap 3.0 with better star detection and plate solving, more accurate adjustment measurements and some handy hints on how good your polar alignment needs to be so that you know when to stop adjusting! You can use the tool to measure your polar alignment accuracy without having a SharpCap Pro license, but with a Pro license you will be able to see live updates on screen showing the current polar alignment error as you adjust your mounts altitude and azimuth.
You can see the guidance phase of the SharpCap Polar Alignment in the screenshot below, showing the correction needed to get polar alignment – which is to move the highlighted star into the yellow target – and the directions and distances that you need to move your mount’s Alt/Az adjusters.

Live Flat Frame Correction
Live flat frame correction uses the high speed multimedia accelerator instructions built into modern CPUs to allow a flat frame correction to be applied to each and every frame captured, even at USB3 video speeds (Note: a high performance CPU is required when using high frame rates with USB3 cameras). Although flat frame correction has been largely associated with deep sky imaging, it’s now an essential part of many Solar imaging workflows to help remove Newton’s rings and other artifacts arising from the use of narrowband solar filters.
Planetary and Lunar images will benefit from using live flat frame correction too as it eliminates dust donuts caused by specks of dust on the sensor, camera window or filter. Of course, you can use the flat frame correction feature while deep sky imaging in SharpCap too – for example while Live Stacking to correct for uneven illumination of the sensor due to vignetting.
Not only will SharpCap apply flat frame correction to every frame that comes from the camera, it will also assist you through the process of capturing a master flat frame by capturing and averaging a series of flat sub frames. Read more…
Dark Frame Subtraction
Dark subtraction is another feature, like Polar Alignment, that has been improved in SharpCap 3.0. It’s now possible to create and use master dark frames that have a greater bit depth than that of the frames being captured, preventing level quantization in the master dark becoming an issue when stacking large numbers of frames. Dark frame subtraction is of course a great tool to use alongside SharpCap’s Live Stacking feature to get the very best images from your EAA session.
Just like the flat frame creation tool, SharpCap has a dark frame creation tool that will help you create averaged master dark frames and store them in a dark frame library.
Background Subtraction
Once you have applied dark and flat frame correction, the background of your deep sky images still won’t be the deep black of space – that’s because you will almost certainly have sky glow due to light pollution. If your sky glow is close to a neutral colour then you can use an image stretch to largely remove it, but if you have a noticeable colour cast to the sky glow (perhaps due to the typical orange colour of streetlights), it can be hard to deal with.
SharpCap background subtraction will remove a constant background level from each colour channel, effectively removing the sky glow and any colour cast associated with it from your images before they are saved or stacked in Live Stacking.
Deep Sky Sequence Planner/Sequence Editor
One of the requests that we’ve heard again and again from SharpCap users is to have the ability to automate part or all of the imaging process. SharpCap 4.0 brings that ability, with two tools:
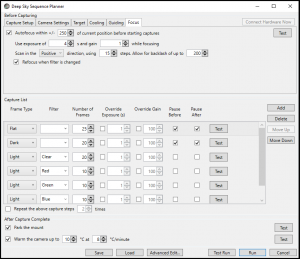
- The Deep Sky Sequence Planner – this allows you to quickly plan, test and then execute a deep sky imaging run. You can let SharpCap automate moving to the target, centering, autofocus, filter wheel changes and much more.
- The Advanced Sequence Editor – if you want to automate things that the Deep Sky Planner doesn’t cater for, from planetary imaging to Live Stacking to all-sky recording, you can probably do it in the Advanced Seqeunce Editor. The editor can automate most of the things that you can do manually in SharpCap (and some things unique to sequencing, such as full autofocus)
Autofocus Assistance
If you use an ASCOM focuser with SharpCap then this is the feature for you! Previous versions of SharpCap had a range of tools to help measure the quality of focus of the image to assist with focusing (and accurate focusing can be one of the hardest parts of Astrophotography). Now in SharpCap 3.0 there are two important new features which can be activated from the Focus Score Graph when using one of the Focus tools and an ASCOM focuser.
The first new feature is the ability to make SharpCap perform an automated focus scan over a user-definable number of steps. Once the parameters are set up, you simply press either the ‘Scan In’ or ‘Scan Out’ button and SharpCap will work through a sequence of focuser movements, measuring the quality of focus at every step. The result will be a graph – like the one shown below – showing how the focus varied with the focuser position. In this case (on a planetary target using the ‘Edge Detection’ mode), higher scores indicate better focus, so the point of best focus is at the maximum of the graph.

Once your graph shows a clear point of best focus, you can either move the focuser back to that point using your normal focuser controls, or use the ‘Goto Best Position’ or ‘Goto Best Score’ buttons. These buttons are the second focus related SharpCap Pro feature and they take care of getting back to the best focus position for you and making sure to approach from the same direction used for the scan to avoid backlash issues. Goto Best Score will even perform a new micro scan to find the best focus point – useful if your ASCOM focuser doesn’t always go back to exactly the same position.
Click to Recenter
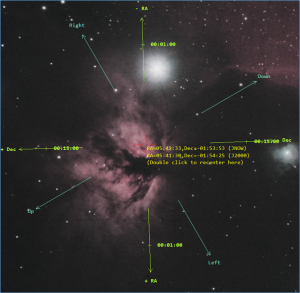
Make framing your deep sky target easy with SharpCap 4.0’s new Click to Recenter feature. If you have a GOTO mount configured in SharpCap and have also set up a supported Plate Solving application (currently Ansvr, Astrotortilla, ASPS or Astap), then SharpCap can show you the sky co-ordinates of everything in your camera’s field of view and recenter on a particular point with a simple double-click.
SharpCap Scripting
One, perhaps, for the slightly Nerdier user, but the ability to write your own scripts using SharpCap’s built in Python scripting language opens up a whole new world of possibilities. In SharpCap 3.0, a full standard Python library is included, which makes using standard Python coding techniques much easier. Some examples of scripts that have been written by SharpCap users include automation for all-sky cameras, automation of filter wheels for LRGB planetary imaging, automatic image capture with text labels being added to each image after capture and automation of eclipse observing sequences. You can even control SharpCap from another application using ‘Pyro’ – a Python remoting package! Read more…
Smart Histogram
Ever wondered whether you are using the right gain or exposure when deep sky imaging? Whether 6x ten minute exposures really do give you more detail than 12x five minute exposures? No more guesswork required with the new SharpCap Pro Smart Histogram feature. In combination with the results of Sensor Analysis (see below), SharpCap can measure the sky background brightness for you and then perform a mathematical simulation of the impact on final stacked image quality of using different gain and exposure combinations. You can also see graphs showing the impact of using longer or shorter exposures (or lower or higher gain) than suggested.
Feature Tracking
This lets SharpCap use your connected ASCOM mount (or ST4 connected camera) to guide the telescope and track on screen image features. Currently it is designed to work with high speed (Solar/Lunar/Planetary) imaging. SharpCap analyzes several frames per second and tracks movement of features between those frames – when the movement exceeds a threshold it will begin to make adjustments to bring the image back to it’s original position. An initial calibration step must be performed so that SharpCap can learn which way and how fast the image moves for the various mount movement directions.
Feature Tracking is currently experimental – please feel free to test and report any issues. More feedback on the performance with different mounts and focal lengths is welcome.
Seeing Monitoring with Auto Capture
This is a new application of the image quality measurement techniques that SharpCap has provided to assist focusing for some time. Instead of helping you find the point of best focus, you can now use the image sharpness measurements to help you capture the moments of clearest seeing without having to sit with your eyes glued to the computer screen at all times.
Launched from the Tools Menu, the seeing monitor shows a chart of the recent range of image quality with the most recent values highlighted. This gives a much more objective measurement of when the seeing is good.

SharpCap Pro users can set a threshold and either have capture start automatically when the threshold is exceeded or even only capture frames above the threshold.
Advanced Live Stacking Options
An option to run stacks using a sigma clipped algorithm is available to SharpCap Pro users. Sigma clipping helps keep rogue pixel values out of the stacked image – for instance aeroplane and satellite tracks can be much reduced or eliminated by the use of the sigma clipping algorithm.
Other advanced features available to SharpCap Pro users include:
- Colour balance adjustments
- Auto-stretch
- Auto-colour-balance
- Sharpening
- Advanced noise reduction
- Dithering via PHD2
Histogram Auto-Stretch
The mini-histogram and live stack histogram both have auto-stretch buttons which analyze the current frame and set the black, mid and white levels automatically to give a good view of the object being imaged. You can even adjust the intensity of the auto-stretch algorithm in the SharpCap general settings page.
Assign more than 2Gb memory to Live Stacking/High Speed Capture
SharpCap on 64 bit Windows uses an advanced approach to memory management that allows it to make the most efficient use of your PC’s memory. By default this is limited to setting aside 1Gb for Live Stacking and 1Gb for caching captured frames when capturing at high speed. With a SharpCap Pro license you can increase these limits – up to a total of half the memory your computer has installed.
As an example, if you assign 3Gb of memory to high speed capture and are using a camera with a 1920×1200 sensor in RAW8 mode, SharpCap will be able to hold nearly 1400 frames in memory ready to be written to disk, greatly reducing the number of dropped frames encountered during Solar/Lunar/Planetary imaging.
Horizontal Banding Suppression
SharpCap includes a processing option to reduce horizontal banding sometimes seen when capturing using CMOS cameras and stretching the image strongly. When present, the banding forms a distinctive pattern in the image data that SharpCap can reduce. The controls for the horizontal banding suppression can be found in the pre-procesing group and are best adjusted on an auto-stretched dark frame image.
Virtual Camera
The virtual camera allows SharpCap to open a series of image files in FITS, PNG or TIF format as if they were frames being captured by a real camera. This allows SharpCap tools such as live stacking to be applied to previously captured images – for instance a live stack could be re-run with different settings on the raw frames saved when the stack was initially captured.
The virtual camera will read existing image files in a selected folder or wait for new image files to be saved into the folder, allowing SharpCap to automatically pick up new images saved by another capture application.
See the documentation for more details.
Two Monitor View
SharpCap Pro now allows you to work across two monitors with one monitor dedicated to showing the image being captured and the other showing the camera controls and other UI such as the live stack controls. This is particularly useful in live stack mode where the live stacking area can be expanded to allow several tabs to be viewed at once. See the documentation for more details.
Planet/Disk Stabilization
New in SharpCap 4.0. Keep a planet or other bright disk centered in the image as long as it stays in view. Helpful for planetary imaging, great when adjusting focus.


