
It’s been quite a long time now since SharpCap 4.0 was released back in June 2021. Throughout 2021 and part of 2022 we added some new features to updates of SharpCap 4.0. That works well for adding small features and tweaking things here and there, but to add some really substantial features needed a new version that could be worked on and tested without breaking SharpCap 4.0.
SharpCap 4.1 has been taken nearly a year in development to get it ready to release, although for at least six months there have been preview versions available to download and try. I have to express my thanks to everyone who took the time to try out new features and report their successes (and failures) to me to help improve the software.
Just looking for the SharpCap 4.1 download page? It’s here.
Major New Features
Live Stacking for Lunar/Solar/Planetary Imaging – see detailed solar system images live in SharpCap with no need to use separate applications for stacking and sharpening.
Lunar and Solar Mosaic Planner – automate capturing mosaics of the moon and sun.
Push-To Assistant – no GOTO mount? No problem! Use plate solving to quickly find a target with a Dobsonian or other manual telescope.
Remote Hardware Support – Support for hardware devices attached to another computer via ASCOM Remote/Alpaca
Hardware Reconnection Support – A glitched connection need no longer end your imaging run. SharpCap will attempt to reconnect to cameras and other hardware if they briefly disconnect.
Solar System Sequence Planner – automates the rapid capture of solar system videos, particularly when filter changes are required.
Other Changes
Live Stacking for Solar/Lunar/Planetary Imaging
Getting great images of solar system targets has always been a bit of a lengthy process – get everything set up, capture videos of the target, load those videos into a stacking application to select the best frames and stack, load the stacked image into some other application to sharpen it, then maybe photoshop for final adjustments. The results can be awesome, but they certainly aren’t immediate!
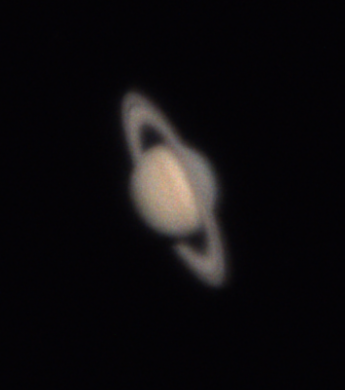
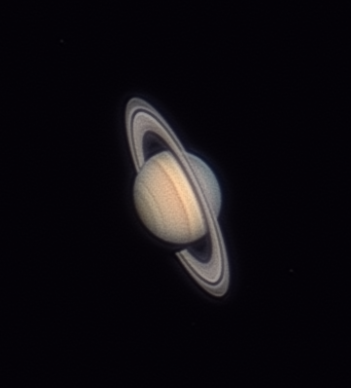
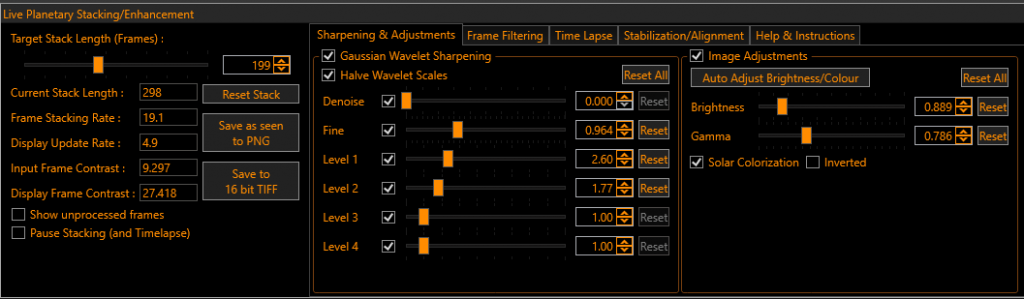
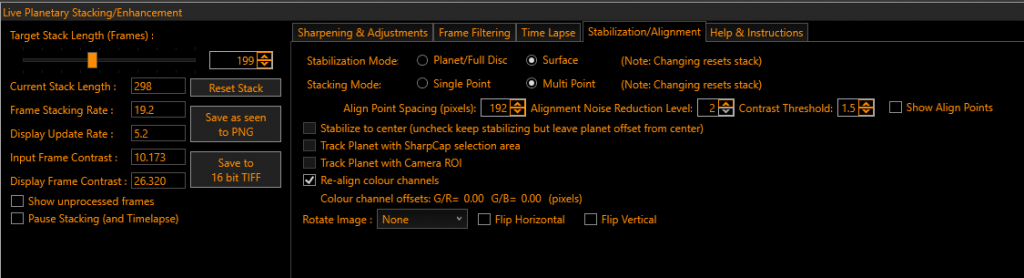
SharpCap’s new Solar/Lunar/Planetary live stacking feature changes all of that – you can filter for the best frames, stack, sharpen (two sorts, including wavelets) and enhance all live while observing. It’s great for outreach and showing friends and family the splendours of the planets. It will also help you improve your technique, since you will be able to try things out and see whether they improve the results pretty much straight away. Just set up as normal for your solar system imaging, get the camera running and the target in view and focused and select ‘Live Solar/Lunar/Planetary Stacking and Enhancement’ from the tools menu. Some sample results are shown below…
Live stacking of the planets is typically done at a fairly small ROI, so will work nicely even on relatively modest PCs or laptops. Solar or Lunar live stacking may require a powerful PC, particularly if you are using a high resolution camera.
There are a wide range of settings you can adjust to fine tune the stacking, including:
- Number of frames to stack
- Filtering to only include the best frames
- Planet or surface alignment
- Single or multi point stacking
- Sharpening and noise reduction settings
- Brightness, gamma, colour and saturation adjustments
- Re-alignment of colour channels for colour images
You can even set the tool up to automatically capture a timelapse to video – great to record Jupiter’s rotation or watch the evolution of solar prominences.
Lunar/Solar Mosaic Planner
Capturing a whole disk Lunar or Solar image in a single shot requires either a short focal length (and therefore limited detail) or a camera with a very large -and expensive – sensor. The alternative is to capture a mosaic – taking multiple images of different parts of the disk and then stitching them together. Capturing a mosaic manually can be hard work, slow and there is always the risk of missing bits. Fortunately SharpCap 4.1 can help by automating the capture process.
All you need is a GOTO mount that SharpCap can control and a camera capable of taking videos.
In order to run a mosaic, SharpCap needs to know three things about the view of the target through the telescope :
- The size of the lunar/solar disc in camera pixels
- Any error in the GOTO mount co-ordinates in the vicinity of the target
- The orientation of the camera view relative to the celestial (RA/Dec) directions
Fortunately, there’s no need to work these out for yourself – SharpCap has a selection of alignment procedures to help work these out quickly and easily.
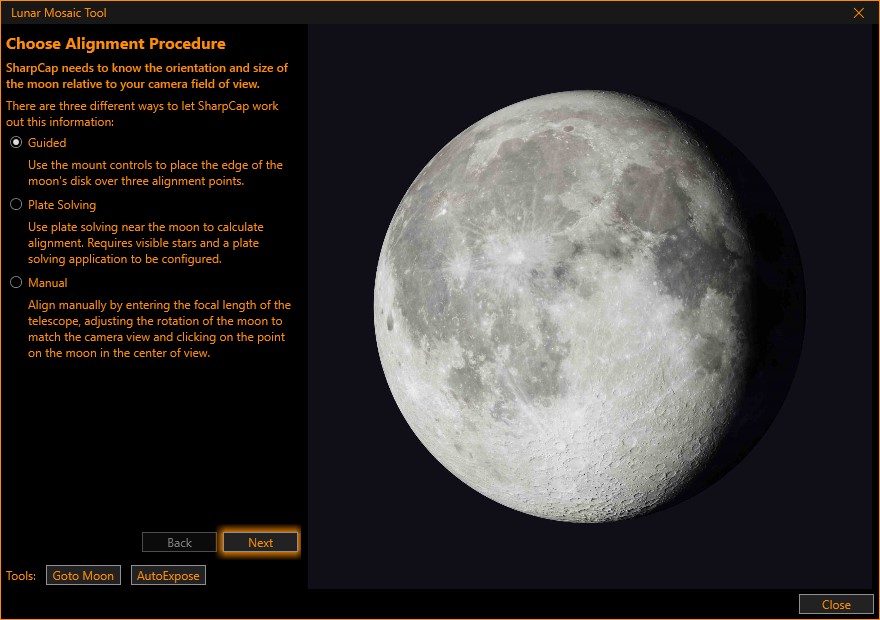
For the Lunar mosaic option, there are three alignment modes available – Guided, Plate Solving and Manual. For a Solar mosaic, the only option is the Guided mode, since Plate Solving requires visible stars and Manual requires you to be able to set the orientation of the image in the camera – easy for a crescent moon, but hard for the sun!
Guided alignment is probably the best choice for most purposes – it involves choosing a side of the disc (lunar or solar) to align on as shown to the right, and then using the mount direction controls to line that point in the image up with 3 different points on screen selected by SharpCap.

The screenshot below shows the first stage of alignment with the top edge of the moon. The very top point on the moon – indicated by the yellow arrow – needs to be moved to the intersection of the red crosshairs by using the mount controls.
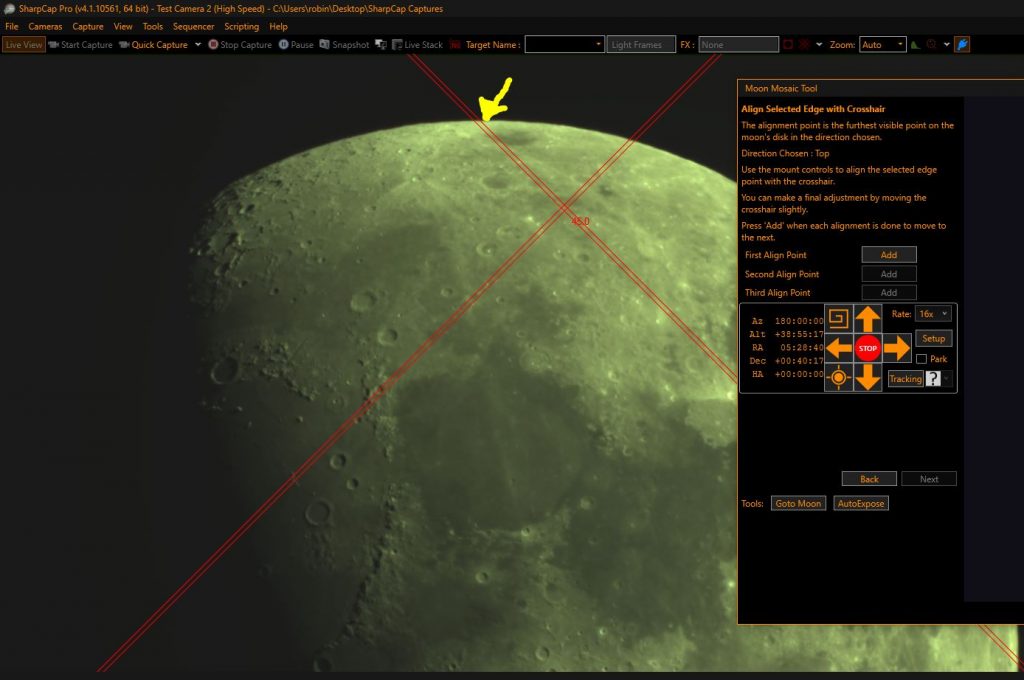
You need to repeat this procedure twice more – SharpCap will choose two more crosshair positions. Once completed, SharpCap can calculate all the information needed to run the mosaic (size of lunar disk, orientation, mount co-ordinate error).
Once alignment is complete, the next stage is to fine tune the mosaic settings to ensure you are going to get the results you want. The two key settings are the ‘Safety Margin’ – how wide an area around the target SharpCap will include in the capture area and the ‘Minimum Overlap’ – how wide the overlap between two adjacent panels has to be. SharpCap shows a diagram indicating the mosaic panels it intends to capture based on the current settings – this will update automatically as the settings are changed.
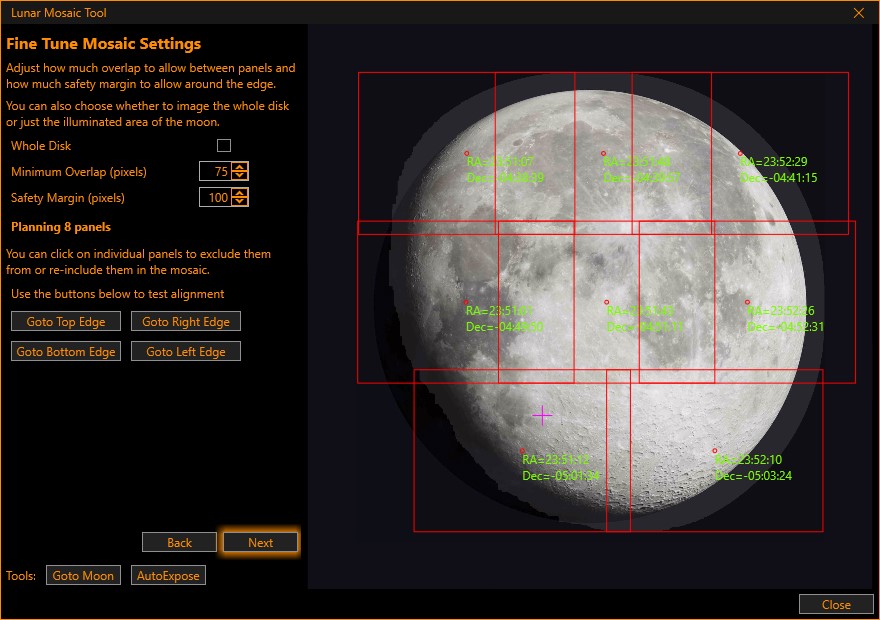
If you have an accurate mount with little backlash, you may be able to use small values for the safety margin and overlap, possibly reducing the number of panels that need to be captured. On the other hand, you may need to increase these values to deal with mount inaccuracy or backlash and avoid having any gaps in the mosaic.
The little pink cross? That shows where SharpCap thinks centre of the camera view currently is…
The final stage of setup is to set the camera settings to be used for capturing, how many frames to capture for each panel and a few other settings. This can easily be done by ticking a few boxes. SharpCap will even auto-set the exposure/gain on the predicted brightest panel of the mosaic and then use those settings for all panels.
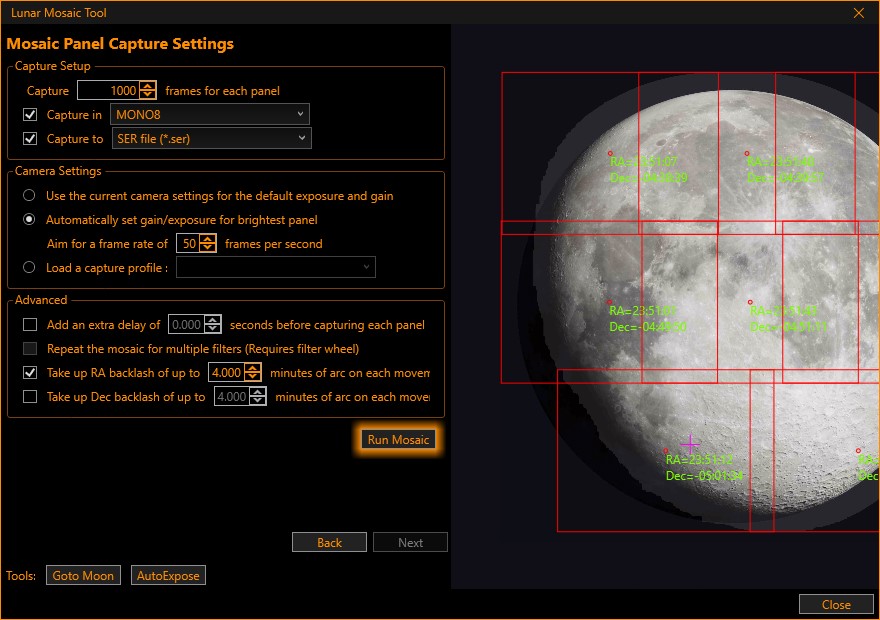
All that’s left now is to press the ‘Run Mosaic’ button and sit back and watch it all happen. SharpCap will arrange for all the captured videos to be saved into a single folder for easy processing and show the current progress by highlighting the current panel in orange and completed panels in green. You can watch the actual mosaic capture in action below.
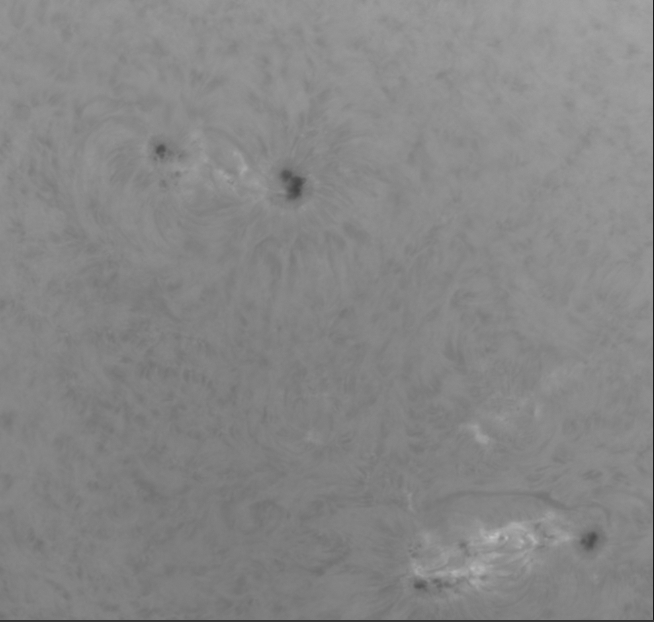
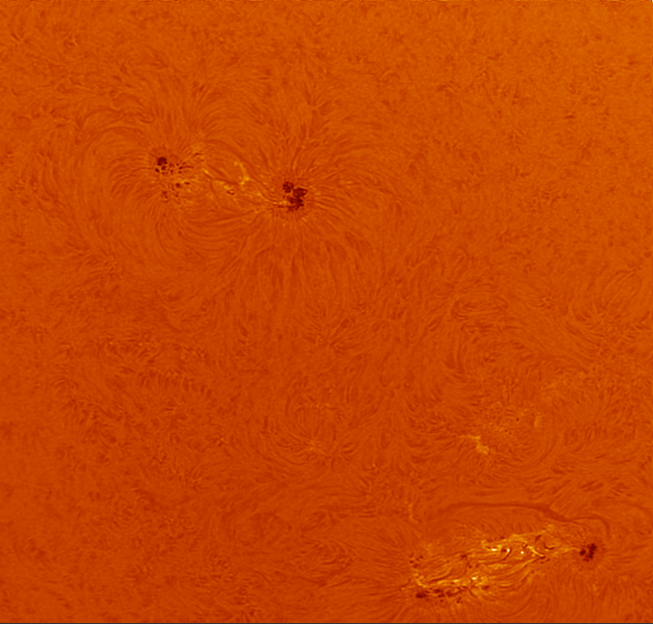
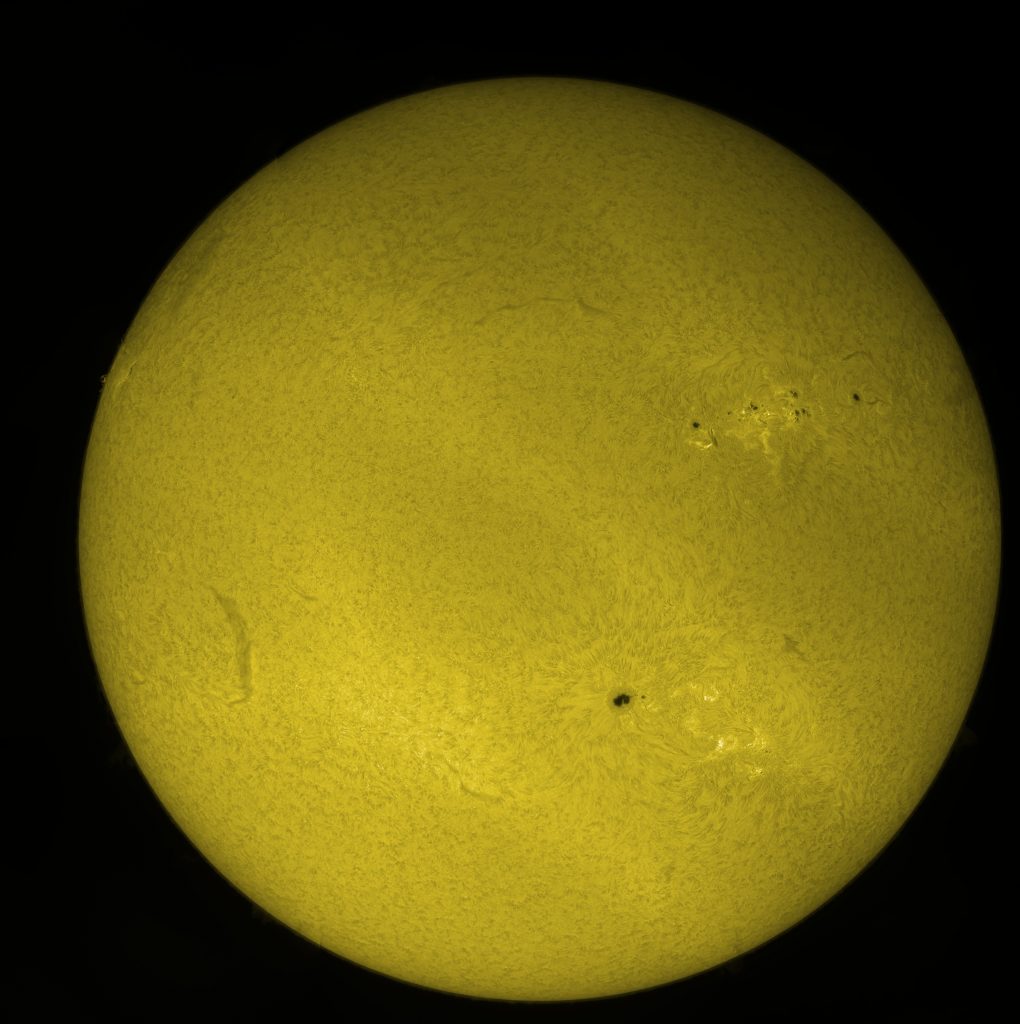
Once you have finished capturing, you can process using your normal stacking application, then stitch the panels together. The image below is a 9 panel solar mosaic captured using the SharpCap mosaic planner, stacked in PlanetarySystemStacker and stitched using Affinity Photo 2.
Push-To Assistant
Using a plate solving application (SharpCap supports Astap, Astrotortilla, Ansvr, ASPS, PlateSolve 2 and PlateSolve 3) revolutionizes finding a target using a GOTO mount. With plate solving, it doesn’t matter if the initial GOTO is off by a degree or so – one quick plate solve and recentre later and the target is right in the middle of the image.
But, what if you use a Dobsonian or a non-GOTO scope? Are you stuck with star hopping and hoping to spot a faint smudge to see the target?
SharpCap 4.1 adds a ‘PushTo’ assistant tool to help those who use non-GOTO scopes find their targets. Simply select it from the Tools menu then choose a target (either from the dropdown list of common targets or from the much larger full catalog). You can even type in co-ordinates if your target isn’t in SharpCap’s catalog…
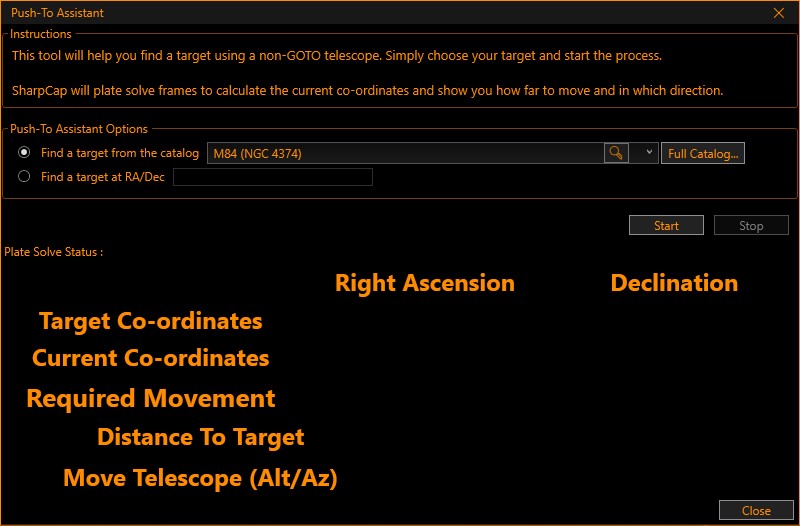
Make sure that you can see stars clearly in the camera image and press the ‘Start’ button.
SharpCap will immediately start plate solving images from the camera. Once an image has solved successfully, SharpCap will show directions for how to move the telescope to get to the target and keep updating them as new images are plate solved and you gradually move towards the target co-ordinates. As you close in on the target, the required movement amounts will become smaller and the highlight colours will shade from reds towards yellows and then greens.
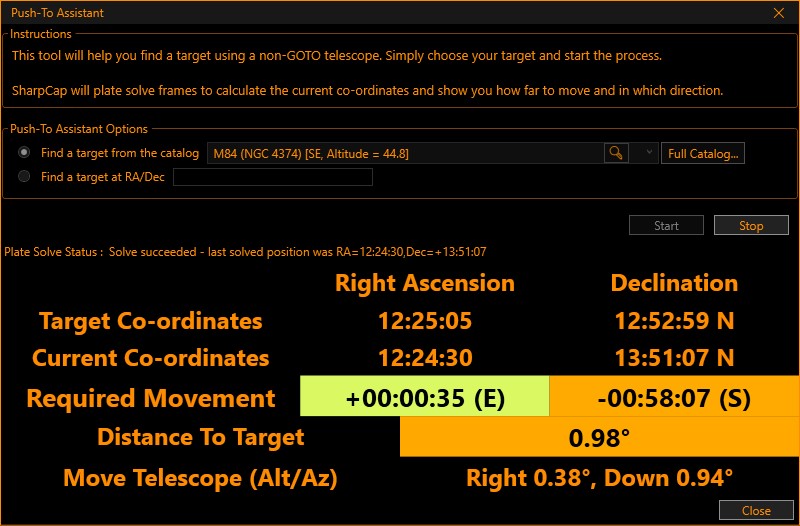
The use of colour helps you know what to do if you have to move away from the computer to adjust the telescope. Advanced users can connect both SharpCap and a planetarium application to a ‘virtual’ ASCOM telescope driver and have the planetarium application automatically update to the current plate solved position through the PushTo process.
Remote Hardware Support
SharpCap 4.1 supports using hardware (Cameras, Telescope Mounts, Focusers, Filter Wheels, Rotators and Switches) that are connected to a different PC via ASCOM Remote or ASCOM Alpaca.
If you have an ASCOM Remote server or an Alpaca server running on your network the SharpCap should automatically detect the devices that are being shared by the server. Shared cameras will appear in the ‘ASCOM Cameras’ section of the ‘Cameras’ menu, other shared hardware will appear in the appropriate dropdown in the SharpCap hardware settings page.
If you start your ASCOM Remote/Alpaca server after running SharpCap then the devices will not appear until you have selected ‘Rescan for remote hardware’ in the SharpCap File menu.
Hardware Reconnection Support
One of the things that SharpCap does while it is running is monitor for USB devices being connected to and disconnected from your system. One reason is so it knows when to refresh the list of available cameras, another is to detect when the camera in use has been disconnected and to close it down gracefully rather than having lots of errors pop up. To help keep track of any problems, each time a device connects or disconnects, SharpCap records that info in the SharpCap log.
We look at lots of SharpCap logs when trying to track down problems and one thing we noticed happening quite often was that a device (a camera, focuser, a filter wheel, etc) would disconnect from USB and then reconnect again maybe a second or two later. Maybe it happens because of a poor cable connection, or a glitch on the device itself, but if it is a device (particularly a camera) that you are using, it probably means a rude interruption to your imaging session.
To help deal with this, SharpCap can now automatically reconnect to most cameras and hardware if the connection drops out unexpectedly and then the device reconnects. For cameras, reconnection is supported for the following manufacturers/camera types: Altair, ZWO, QHY, Player One, SVBony and Webcams.
You can test this out for yourself if you have a supported camera – open the camera in SharpCap 4.1 and then pull out the USB cable from the camera. You should see a prompt like this pop up when SharpCap has detected the camera has gone missing

You can watch the time remaining count down if you want, but before it gets too low, plug the USB cable to the camera back in. SharpCap will detect the camera reconnect and show a prompt to indicate that it is trying to reconnect – like this.

After a few seconds the camera should complete the reconnect and SharpCap will carry on doing whatever it was doing before the disconnection, even in the middle of a capture or when running a sequence.
Automatic reconnection of ASCOM hardware (focusers, mounts, filter wheels, etc) works a bit differently. If SharpCap receives an error when trying to carry out an action on the hardware (moving the focuser, slewing the mount, etc), it will go through a series of retries to see if that fixes the problem in this order
- If the ASCOM driver is unexpectedly disconnected, try to reconnect to it
- Wait a short period (0.5s)
- Retry the action
- If still not working, disconnect and then try to reconnect the ASCOM driver
- Retry the action again
If any of the retries is successful then SharpCap will continue as normal (apart from seeing a notification that a retry has happened). Hopefully this approach will help deal both with disconnection issues and also with cases where an ASCOM device glitches from time to time for some reason – with two retries it’s much less likely to become a showstopping issue.
Solar System Sequence Planner
SharpCap 4.0 introduced the incredibly flexible sequence editor along with the much easier to use Deep Sky Sequence Planner. Using the sequence editor to automate captures of solar system targets (for example capturing a target with a mono camera using multiple filters) was possible but complicated to set up.
SharpCap 4.1 adds a Solar System Sequence Planner, which makes it much easier to create sequences of that type from scratch.
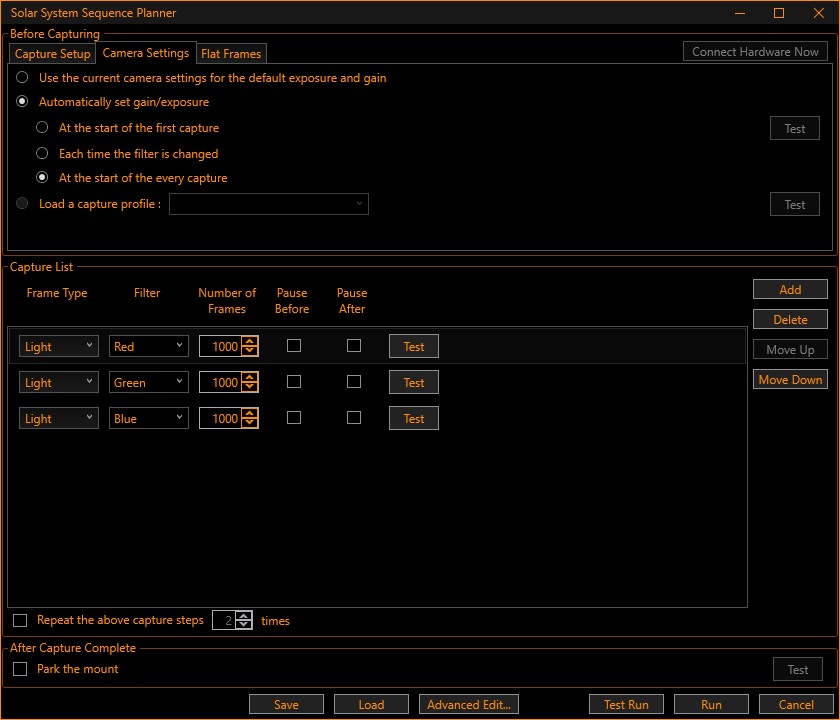
As well as specifying a list of captures to run and the filters to use, you can ask SharpCap to auto set the exposure and gain for each capture (since different filters may require different settings). You can even set up different flat frames to be used for each filter in the ‘Flat Frames’ tab to take account of any blemishes on your filters that might otherwise leave dust shadows.
As with the Deep Sky Sequence Planner, individual steps can be tested on their own if it makes sense to do so and there is a ‘Test Run’ option that will run the whole sequence through with the number of captured frames set to a minimal value to check everything works. There’s also the ‘Advanced Edit’ button which will convert all the choices made in the planner into a sequence that can be edited further in the full sequence editor.
Goto Target Improvements
The first thing you might notice is a change of name from ‘Goto Co-ordinates’ in SharpCap 4.0 to ‘Goto Catalog Target/Co-ordinates’ in SharpCap 4.1 – that reflects the increased importance of using the catalog to pick a target rather than just entering co-ordinates.
Looking at the Goto window itself, you will also notice some changes :
- There is an ‘Emergency Stop’ button that you can use to stop the GOTO if it looks like something is going wrong
- The catalog selection option has moved above the co-ordinate entry option
- When entering co-ordinates you can also add a target name
- There are new options to use plate solving to refine the final position and also to reduce the exposure and increase gain during the procedure
- If you use the Goto tool with live stacking running then it will save and finish your current stack before moving, and optionally start a new stack on the new target.
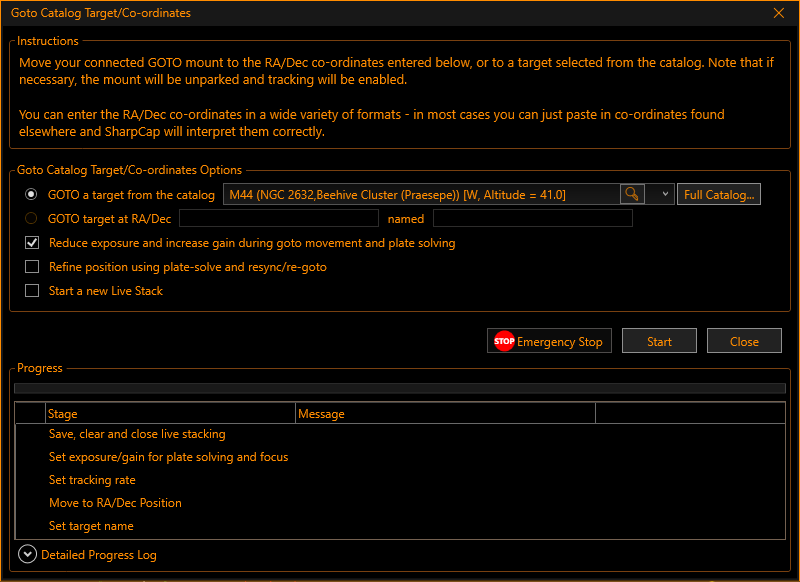
The default catalog has been enhanced with about 10000 extra HIP catalog stars (down to magnitude 7) as well as addition of some common names of stars and other targets that were missing. The solar system targets now also appear in the drop down ‘quick catalog’ list as well as in the full catalog.
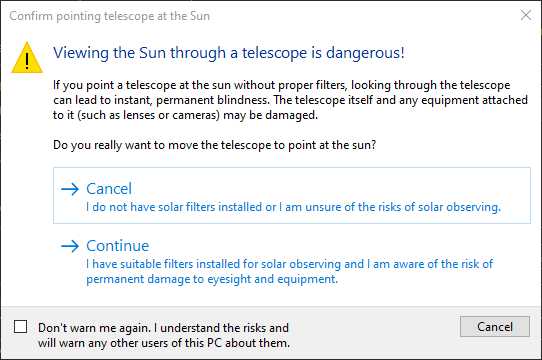
Finally, if you use this tool (or the solar mosaic tool) to move the telescope to point towards the sun, SharpCap will now show you a warning about the dangers of viewing the sun through a telescope without the correct protective filters.
Camera Controls Improvements
SharpCap 4.1 brings some improvements to help you control your camera and easily get the settings that you need.
Exposure/Gain Shift Control
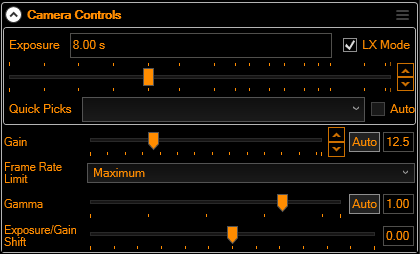
The first thing to notice is the new ‘Exposure/Gain Shift’ control that will appear at the bottom of the Camera Controls section for supported cameras :
Moving this control to the right will increase exposure but decrease gain, keeping the image brightness the same. Moving it to the left will do the opposite – decrease exposure and increase gain. It’s particularly useful for moving between deep sky imaging (long exposures, low gain) and focus/framing/plate solving (shorter exposures with higher gain). You can also use the F9 and F10 keys to adjust this control, with F9 halving exposure and increasing gain to match and F10 doing the opposite.
When you adjust either the exposure or gain control values manually then this control will reset to zero. This control will not appear for some cameras if SharpCap does not understand how setting the gain value of the camera affects image brightness. In particular, it will not appear for ASCOM cameras and for many QHY cameras.
Fine Exposure and Gain Adjustments
Another refinement is the addition of fine adjustment buttons to the exposure and gain controls, which can be seen to the right of the sliders for these controls in the screenshot below. These buttons make a change of about 2% to the value of the control each time they are pressed, so can be used for small changes if you find dragging the slider to an exact position tricky. Remember that you can also type in control values in the boxes that display the current value if you want an exact value and can make relatively large changes by clicking to the left and right of the current slider position.
Another thing worth noting in the image above is that the slider markers are in high contrast solid orange. This can make them easier to see, particularly if you are solar imaging and have sunlight falling on the computer screen. The high contrast sliders can be turned on in the ‘General’ page of the SharpCap settings.
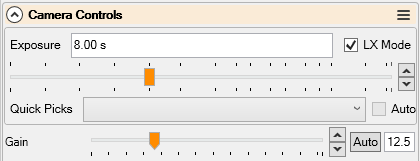
Easy selection of ROI
A useful new feature also allows you to select a custom capture area by dragging around a selection rectangle on the current image. You can start this by pressing the ‘Select ROI’ button next to the ‘Capture Area’ drop down.
Pressing ‘Select ROI’ will make the red selection area box appear over the image, which you can move around in the normal way by dragging the corners, sides or who the whole box. Also, the ‘Select ROI’ button will change to ‘Apply ROI’. Once you have the area that you want inside the red selection rectangle, press the ‘Apply ROI’ button and the camera ROI will be changed automatically for you. Note that this feature is not available for some cameras that do not allow a ‘Custom’ ROI option.
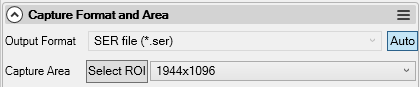
Display Stretch Improvements
SharpCap 4.1 adds two new buttons to the display histogram stretch control to make it easier to use and more functional
- An on/off button (top left) – using this you can turn the stretch off without adjusting the settings, then turn it back on again later
- A locked auto stretch mode (bottom of the right hand column) – turning this on makes SharpCap re-apply the auto-stretch on a frame-by-frame basis – great for bringing out faint details under changeable conditions.
Live Stacking Improvements
Live Stacking gets some interesting improvements in SharpCap 4.1, covering stacking, image enhancement, interaction with guiding and mount movements and also usability.
Comet Mode Stacking
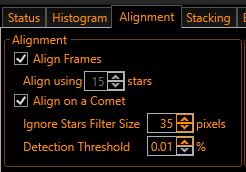
Comet Mode stacking can be enabled by ticking the ‘Align on a Comet’ box on the ‘Alignment’ tab. When comet mode is enabled, SharpCap will try to ignore all the stars in the image and attempt to locate the centre point of the brightest fuzzy blob in each frame. Frames will be stacked by lining up the fuzzy blob position from frame to frame, giving an image of the comet but allowing the stars to show as trails.
To get comet stacking mode working properly, it’s necessary to adjust the ‘Ignore stars filter size’ and ‘Detection Threshold’ values so that the comet is properly detected – turn on the ‘Highlight Detected Stars’ option and check that the box is drawn around the nucleus of the comet.
Remember to turn comet stacking off when you return to imaging normal deep sky targets!
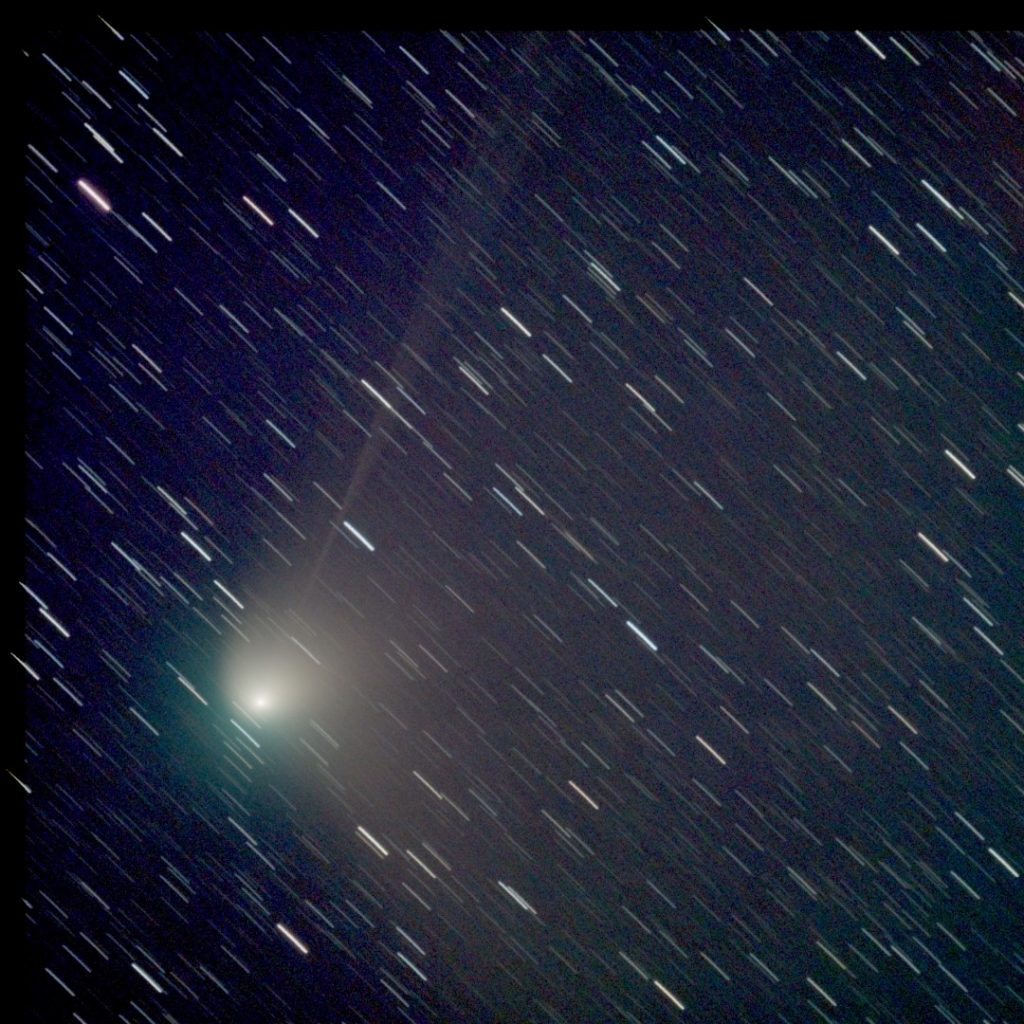
Image Enhancement Improvements
SharpCap 4.1 adds a new ‘Colour Noise Reduction’ option which is very effective at reducing the speckled colour noise visible when stretching the image – particularly in the early stages of a stack when noise levels are high. Colour noise reduction applies blurring to the hue and saturation data in the image, but does not affect the luminance, so tends not to blur image features.
Image sharpening has been refined, with the Weiner deconvolution now only applied to the luminance of colour images to avoid generating spurious colour noise effects. Unsharp mask sharpening can optionally be applied only to luminance.
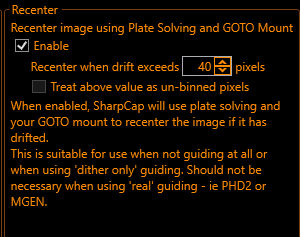
Dithering and Recentring
The way that SharpCap interacts with a guiding application has been updated to help fix a number of issues that could crop up from time to time causing dithering frames to be considered for stacking. Additionally, there is now an option to periodically re-centre the stack using plate solving as an alternative to guiding and dithering.
The option to enable re-centring can be found on the right hand side of the ‘Guiding’ tab and is enabled when guiding is disabled or when ‘dither only guiding’ is active. You can specify the amount of image drift (in pixels) is allowed to accumulate before a recentre action is carried out. Of course, you must have a plate solving application set up on your PC and configured in SharpCap to use this option.
Usability Improvements

There are a couple of tweaks to make it easier to adjust the live stacking histogram and colour balance.
Firstly, it’s now possible to zoom the horizontal axis of the histogram by a factor of about 5 by ticking the ‘Zoom’ checkbox next to the ‘Log’ checkbox (the Log checkbox makes the horizontal axis logarithmic scaled, which is also good for getting fine adjustment near the black level).
It’s also now possible to make fine adjustments to the colour balance sliders by holding down the <SHIFT> key before you start dragging them with the mouse – when you do this the slider will move about 10 times slower than usual in response to the mouse movements.
Finally, there is a new ‘Stretch Mode’ option available to change the shape of the standard stretch curve slightly. Stretch Mode 2 corresponds to the default curve shape in older versions of SharpCap. Lower stretch modes apply more stretch in darker areas but may lead to brighter areas becoming blown out. Higher stretch modes may help with bright targets like M32 or M42 to help avoid the brightest regions being completely white.
Live Stacking Options
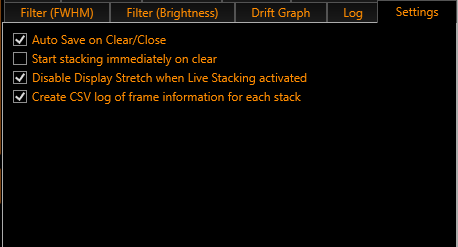
Finally, Live Stacking now has a small number of options that can be set in the settings tab, including:
- Whether or not to auto-save the stack when the stack is reset or live stacking is closed
- Whether a new stack should be started automatically when the current stack is cleared (if this is disabled then live stacking will enter pause mode when cleared – press ‘Start’ to begin a new stack)
- Whether SharpCap should automatically disable the display stretch when live stacking is activated (and re-enable it when live stacking is closed). This can be useful because a display stretch that gives a good view of individual frames can over brighten a stacked image
- Whether to create a log file containing information about each frame processed during stacking.
Image Processing Improvements
SharpCap 4.1 adds some new controls and options to the ‘Preprocessing’ section of the camera controls
- A new flip control that can flip the image horizontally, vertically or both. This control should be used in preference to any flip controls provided by the camera itself, since it is applied after the image has been processed for dark subtraction and/or flat correction. Performing the flip after dark/flat correction means that there is no need to have dark and flat frames for each flip option that you intend to use – you can capture a single set of dark and flat frames and use those for all flip options.
- An additional entry in the ‘Dark Subtraction’ control to enable ‘Hot and Cold Pixel Removal’. Like the ‘Hot Pixel Removal Only’ option, this does not actually use a dark frame – it simply and automatically eliminates hot and cold pixels by looking for pixels that have values that are wildly different to neighbouring pixels.
- Background subtraction has two new non-linear background removal modes which may help in cases where there is a complex gradient in light pollution.
- A new option to mask overexposed pixels to black, which may be useful when imaging the chromosphere of the sun to automatically set the over-exposed solar disk to black.
Hardware Improvements

SharpCap 4.1 adds an incredibly convenient new toolbar button to connect all hardware – focusers, mounts, filter wheels, etc. You’ll find it on the very right hand side of the toolbar, looking like a blue plug (US style) on a short lead. When it is highlighted (as shown to the right), all hardware is already connected and pressing it will disconnect. When not highlighted, pressing it will connect all selected hardware.
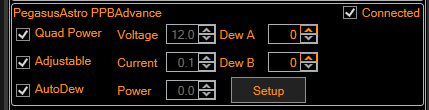
Another thing to watch out for is the addition of ASCOM Switch support – this lets you control ASCOM switch devices from within SharpCap, meaning that you can adjust things like dew heaters and 12V power outputs without leaving the application. Additionally, if your switch device provides any info readings, you’ll see those in SharpCap too.
If you have updated from an old version of SharpCap 4.0 then ASCOM Rotator support might be new to you too. You can adjust the orientation of your rotator from within SharpCap and use SharpCap to match orientations with an existing image by using the ‘Goto Image’ tool.
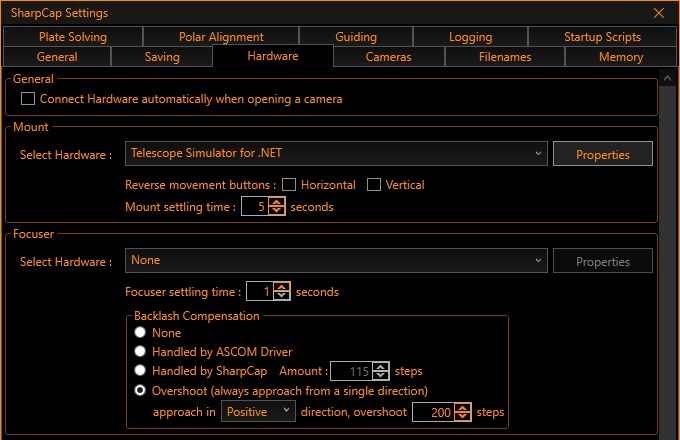
Finally, if you are using a mount or focuser in SharpCap, you can now set a ‘settle time’ to adjust how long SharpCap should wait after the device reports that it has stopped moving before trusting the setup to actually be steady. This can be adjusted in the Hardware settings
Camera Support Improvements
SharpCap 4.1 adds some important features and updates for various types of cameras
- Atik Cameras – Filter wheel support added along with adding support for controlling gain on older cameras
- Basler Cameras – Update to support Pylon 7.3.0
- Moravian Cameras – Add filter wheel and GPS module support
- Player One Cameras – Add cooled cameras support
Additionally there have been many small improvements and bug fixes across the whole range of cameras supported by SharpCap.
Please note that SharpCap 4.1 does not include support for iNova Cameras. iNova appear to have left the camera market and never provided code to access their cameras from a 64-bit version of SharpCap (which is now the recommended and default version for SharpCap 4.1).
Focus Scores/Autofocusing
SharpCap 4.1 includes improvements to focus detection and autofocusing algorithms, including:
- Option to make the selection area track the brightest object in the image for planetary style focus scores
- Option to use 2×2 binning or to select a colour channel for some focus score types
- Better detection of ‘donut’ stars – created by out-of-focus SCT or Newtonian telescopes when using multi-star FWHM
- Improved detection of best focus curves
- An experimental option to use a ‘V’ shaped curve fit rather than the default ‘U’ shaped fit.
- Autofocus sequencer steps will return to the original position if they fail to find best focus, allowing for retry or continuing at previous focus position
- Smart Scanning ‘backward jump’ to try to fill in missing data at the start of the scan removed for now due to causing more issues than it solved.
Hotkeys
While most people use a mouse, trackball or touchpad to control SharpCap, experienced users often find that using keyboard shortcuts for some features is faster and more accurate. SharpCap 4.1 adds a selection of new keyboard shortcuts, including
- F9 and F10 adjust the Exposure/Gain shift control.
- The current image zoom level can be adjusted using CTRL+PLUS and CTRL+MINUS to zoom in and out.
- CTRL+1 sets 100% zoom, CTRL+0 zooms to fit the image in the available on-screen space.
- CTRL+SHIFT+F1 to F12 change filter if a filter wheel is connected
- CTRL+SHIFT+C – toggle connect/disconnect of all hardware (filter wheel, mount, focuser, etc)
- CTRL+SHIFT+G – launch GOTO catalog target window
- CTRL+SHIFT+H – activate histogram
- CTRL+SHIFT+L – activate Live Stacking
- CTRL+SHIFT+P – activate Polar Alignment
- CTRL+SHIFT+A – activate deep sky image annotation
- CTRL+SHIFT+R – run an automatic refocus
- CTRL+SHIFT+V – activate pixel value readout
Finally, it’s worth knowing that the ESCAPE key will stop the current capture, and if held down it will cancel a simple sequence of captures started from the ‘Start Capture’ window.
New Sequencer Steps
SharpCap 4.1 adds a range of new sequencer steps which can be used in the sequence editor, as well as being used by tools such as the Solar System Sequence Planner and the Mosaic Planners. The new steps include :
- A step that will wait for the next frame to arrive from a camera running in live view (‘Wait for next live view frame’)
- A ‘Repeat until time’ step that will repeat the sub-steps until the specified time of day
- A ‘Wait until later than’ step which will complete when the current time is later than the specified time
- A step to save settings to a capture profile (‘Save Camera settings to profile’)
- A step to put all capture files from the sequence in a single folder (‘Arrange captured files in a single folder’)
- Steps related to connecting, disconnecting or adjusting ASCOM switch devices.
- Steps to auto set exposure and gain for solar system targets or for flat frame capture (‘Solar system auto set exposure/gain’, ‘Flat frame auto set exposure/gain’).
- A step to adjust exposure/gain for plate solving and focus by reducing exposure and increasing gain (‘Set exposure/gain for plate solving and focus …’). Will adjust settings back to original once the sub-steps have completed
- Steps to allow GOTO solar system targets with optional offsets to support mosaic captures.
Other Improvements
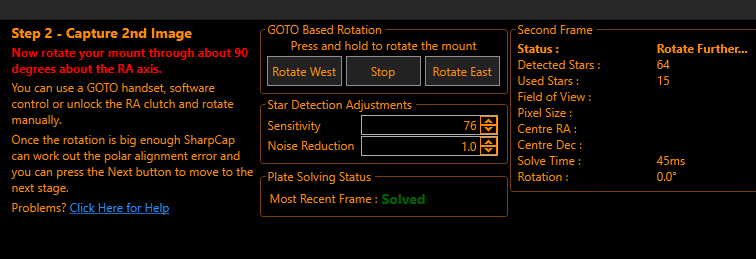
Polar Alignment GOTO based rotation
If you have SharpCap connected to a GOTO mount then a new set of buttons will appear in the Polar alignment tool so that you can perform the rotation using the GOTO mount. Hold down either the ‘Rotate East’ or ‘Rotate West’ buttons to move the mount in RA, and let go when it has moved far enough
Disk Space Monitoring
SharpCap now monitors the free space on the disk which capture files are saved to, and displays the current figures in the status bar, as shown below.

Additionally, SharpCap will show warning notifications when the amount of free disk space drops below 1Gb, then 100Mb, then a critical warning when it drops below 10Mb.
Simpler Installation
Previous versions of SharpCap sometimes needed to download and install a Microsoft component called the ‘.NET framework’ from the internet. If this wasn’t already installed and you had no internet connection then the SharpCap installation could fail. SharpCap 4.1 is a self-contained installer and does not need a separate ‘.NET Framework’ installation, so this issue is avoided.
Additionally, SharpCap 4.1 will help you install a SharpCap Pro license key by detecting automatically that there is a license key on the clipboard when the program starts or when you show the ‘SharpCap Pro License’ window. If a key is found on the clipboard then you are prompted to use that as the new key.