
No matter how much I adjust I can’t get the error down to zero!
STOP!!! You don’t need to get the polar align error down to exactly zero and you are wasting clear sky time if you try! A polar alignment within 1 arc minute of the pole is usually considered to be excellent and good enough for long exposure imaging.
Stuck at the first Step? The ‘Next’ button never becomes enabled?
Getting stuck at this stage means that SharpCap can’t plate solve the view from the camera and work out where near the pole the camera is pointing. The most recent frame status will be ‘Could Not Solve’ in red all the time and the First Frame Status will be ‘Working’. Sometimes you will find that you will eventually get past this stage if a frame from the camera happens to be a bit better than the others and plate solves – don’t be tempted to move on if that happens as you will get stuck further on – fix the problem by running through the troubleshooting steps below instead.
The likely causes for this problem are:
Not enough stars being detected
if the number of detected stars is low (less than 10) then this is the most likely cause. Here are some suggestions to fix the problem
- Increase camera exposure up to 2-4s
- Increase camera gain if the camera has a gain control. Start at about 1/2 gain and work up towards maximum
- Try a digital gain of 2x or 4x if your camera has no gain control
- Reset the Star Detection settings to default if you have adjusted them
The camera/telescope is pointed more than 5-6 degrees away from the pole
If plenty of stars are being detected, but the plate solving still fails, you could be starting from too far away from the pole
SharpCap has a star database out to 5 degrees away from the pole (7 degrees in SharpCap 3.1). If the image is taken of an area further from the pole than this then plate solving will fail. If you have a network connection, you can check how far you are from the pole by saving a frame (press the ‘Snapshot’ button) and uploading it to nova.astrometry.net for plate solving. If you have a plate solving tool installed on your PC you could use that instead.
Hot pixels are being detected as stars
Some cameras suffer from hot pixels (pixels which have maximum value even though no light falls on them). With some star detection settings, single hot pixels may be detected as stars. If enough of these hot pixels exist and are detected, they may confuse the plate solving algorithm.
SharpCap 3.1 and above will show a warning below the star detection options if the combination of options mean that hot pixels would be detected as stars. You only need to worry about this if your camera is prone to hot pixels at the exposure/gain settings you are using. You can stop hot pixels from being detected by increasing the noise reduction setting, increasing the minimum star width or reducing the digital gain.
Stuck in Step 2 or Step 3, nothing updates or everything takes a very long time
Once you have made adjustments to your telescope or moved SharpCap on to a new step in the polar alignment process, you shouldn’t have a long wait to see the results or for SharpCap to find a solution – a few seconds or so is typical. If you find yourself waiting more than 15 seconds then something isn’t right and the most common cause is that SharpCap is not able to plate solve every frame that is coming from the camera – in fact it might only be solving one frame in 10 or even one in 100.
This problem is easy to spot because the ‘Most Recent Frame’ status will be ‘Could not solve’ in red most of the time, but will change to a green ‘Solved’ every now and then.

This problem has exactly the same causes as the problem of being stuck at step 1 above. The best solution to this problem is to restart the alignment process and follow the suggestions above until the ‘Most Recent Frame’ status is showing as ‘Solved’ for every frame.
Note that sometimes you find this problem occurs for Step 2 even though you had a good solution straight away for Step 1 – this could be because the rotation around the RA axis has moved the camera to point to an area of sky that is harder to plate solve (perhaps fewer bright stars). A good trick for this problem is to leave the RA axis rotated but reset the SharpCap Polar Align routine back to Step 1 – then adjust the camera settings and star detection settings to get good plate solve in the rotated position before continuing the process by rotating back to the home position.
I get the wrong results – SharpCap says my Polar Alignment is great after adjustment, but it isn’t!
The first thing to check is that you have pressed the ‘Next’ button to move to the adjustment stage before you started tweaking the Alt/Az of your mount. If you don’t move to the adjustment stage then you will get incorrect polar alignment. Update to SharpCap 3.1 which improves polar align to make this common slip up much harder to make.
The next most common cause of this is that something is shifting as the mount is being rotated around the RA axis. If you are using a guide scope/camera it could be that the scope is not mounted firmly or that a cable is pulling (or just hanging loose) which can shift the camera slightly. This problem has also been experienced by people who have a problem with their RA axis bearings!
The first thing to do if you suspect this problem is to confirm you have an issue. Run a SharpCap polar align normally (starting in the home position and rotating 90 degrees), and adjust as usual. Once you are finished, leave the scope at the 90 degree position and re-run polar alignment in SharpCap (this time rotating back to the home position when prompted to rotate). If the measurement from the second PA run matches the first then you probably don’t have this issue. If it doesn’t match by a big margin then flexure/movement as you rotate is the likely cause.
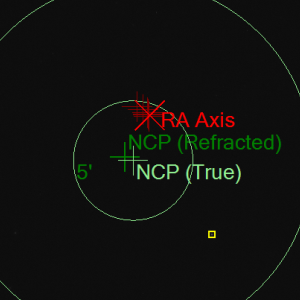
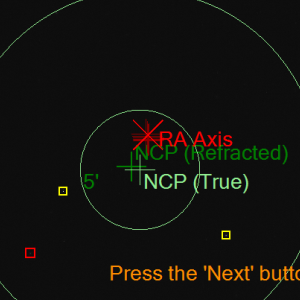
In SharpCap 3.1 you can test for this problem quite easily by rotating the mount in stages of about 15 degrees. SharpCap plots a dark red cross at the point it calculates to be the center of rotation (where the RA axis is pointing) for each stage of the rotation – these should form a tight group on screen if there is no flexure. In the screenshots below I deliberately let the cable to the guide camera hang loose for the polar alignment run shown on the left. Here you can see that the measured RA axis positions have drifted as I have rotated further due to the weight of the cable pulling on the camera. Once the cable was properly secured the RA axis positions form a much tighter group.
|
Loose Cable
 |
Secured Cable
 |
If you discover that you have problems with flexure when rotating you can obviously try the usual hardware fixes of tightening all connections and securing all cables. Another possible trick that can help is to run the two steps of the polar alignment at about 30-40 degrees left of home and 30-40 degrees right of the home position. Depending on how your equipment is configured there may be less flexure when using this approach because the scope is largely ‘up’ during the hole procedure rather than going from ‘up’ to ‘sideways’ after rotation.
The directions that SharpCap says I should move my mount are wrong
Firstly, make sure that you have pressed the ‘Next’ button to move onto the adjustment stage before adjusting the mount Alt/Az. If you start adjusting before pressing the ‘Next’ button then your final alignment result will be incorrect and the direction indications (up/down/left/right) will not appear to work correctly. If you are using SharpCap 3.0, update to SharpCap 3.1 which only shows the direction guides after pressing next to avoid this problem.
Secondly, remember that the directions given are assuming that you are looking at your mount and you are facing in the direction of the pole (ie the telescope is pointing away from you at the pole). An instruction to move up means ‘move the mount altitude so that the objective end of the telescope is pointing higher up’, while right means ‘move the mount azimuth so that the objective end of the telescope points further to the right (east for NH. west for SH)’.